DL-POLY v4.09
The Atomes helper for the DL-POLY calculation offers to prepare input files for DL-POLY v4.09. The CONTROL, FIELD and CONFIG files can be entirely designed.
Before going further it is strongly advised to read the DL-POLY user manual:
ftp://ftp.dl.ac.uk/ccp5/DL_POLY/DL_POLY_4.0/DOCUMENTS/USRMAN4.pdf
Initializing the force field
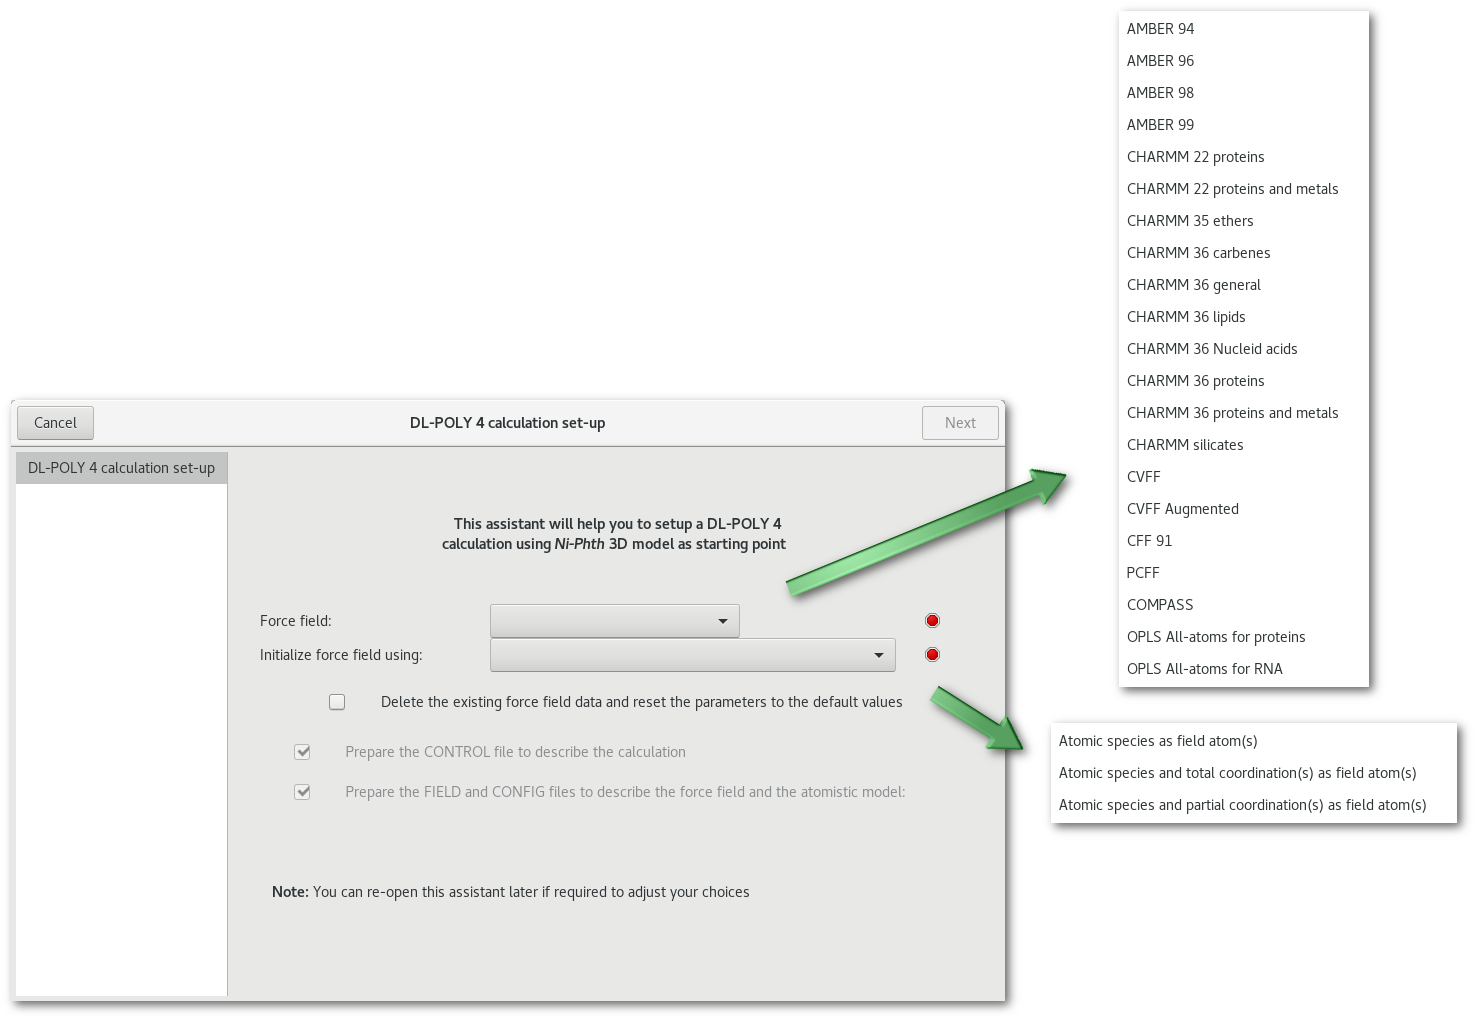
The mandatory first step in the DL-POLY calculation assistant is to initialize the force field, as illustrated in figure 7.1 it required to select both:
The force field to be used, ie. the data source for many of the "
FIELD" file parameters including: bonds, angles, dihedrals and inversions.
The FIELD file parameters can be imported from the following force fields:
OPLS force fields:
OPLS All-atoms for proteins
OPLS All-atoms for RNA
CHARMM force fields:
CHARMM 22 proteins
CHARMM 22 proteins and metals
CHARMM 35 ethers
CHARMM 36 carbenes
CHARMM 36 general
CHARMM 36 lipids
CHARMM 36 Nucleid acids
CHARMM 36 proteins
CHARMM 36 proteins and metals
CHARMM silicates
AMBER force fields:
AMBER 94
AMBER 96
AMBER 98
AMBER 99
Consistent force fields:
CVFF
CVFF Augmented
CFF 91
PCFF
COMPASS
Theses parameters are read by Atomes on the fly / by request from the corresponding files located in the directory: "bin/library/force_fields".The atoms description to initiate the force field, ie. the first "rough" type of field atoms for the initial description of the force field:
The atomic species
The atomic species and the total coordination(s)
The atomic species and the partial coordination(s)
Once the force field has been initialized the default pages populates the assistant:
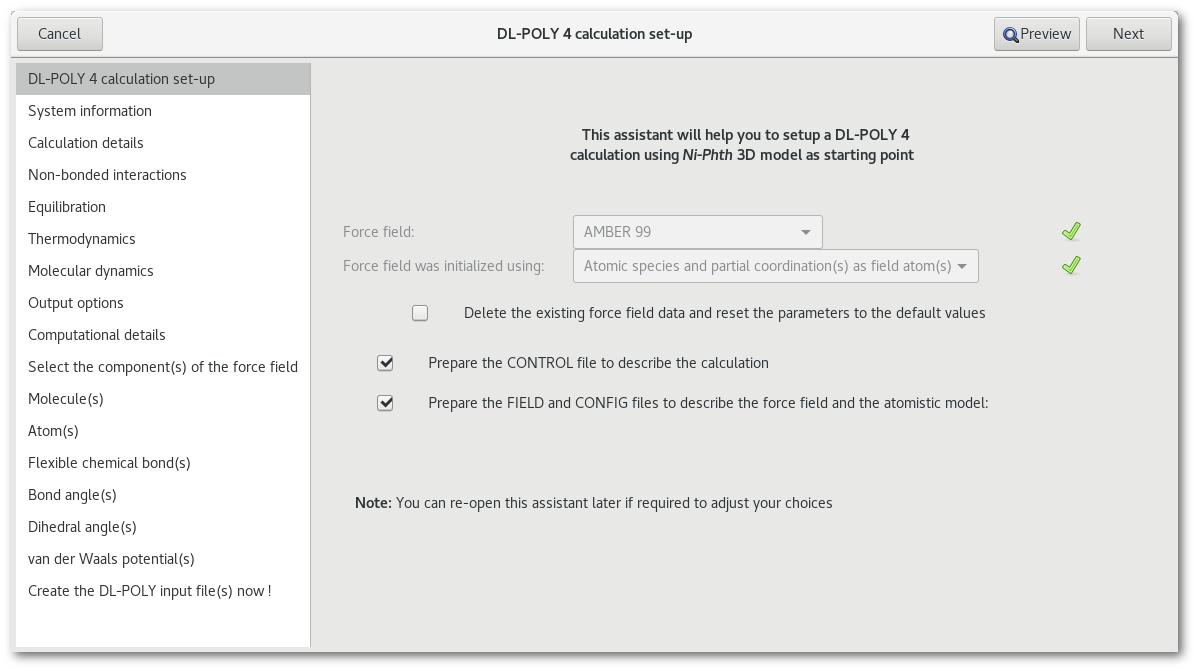
The "CONTROL" file
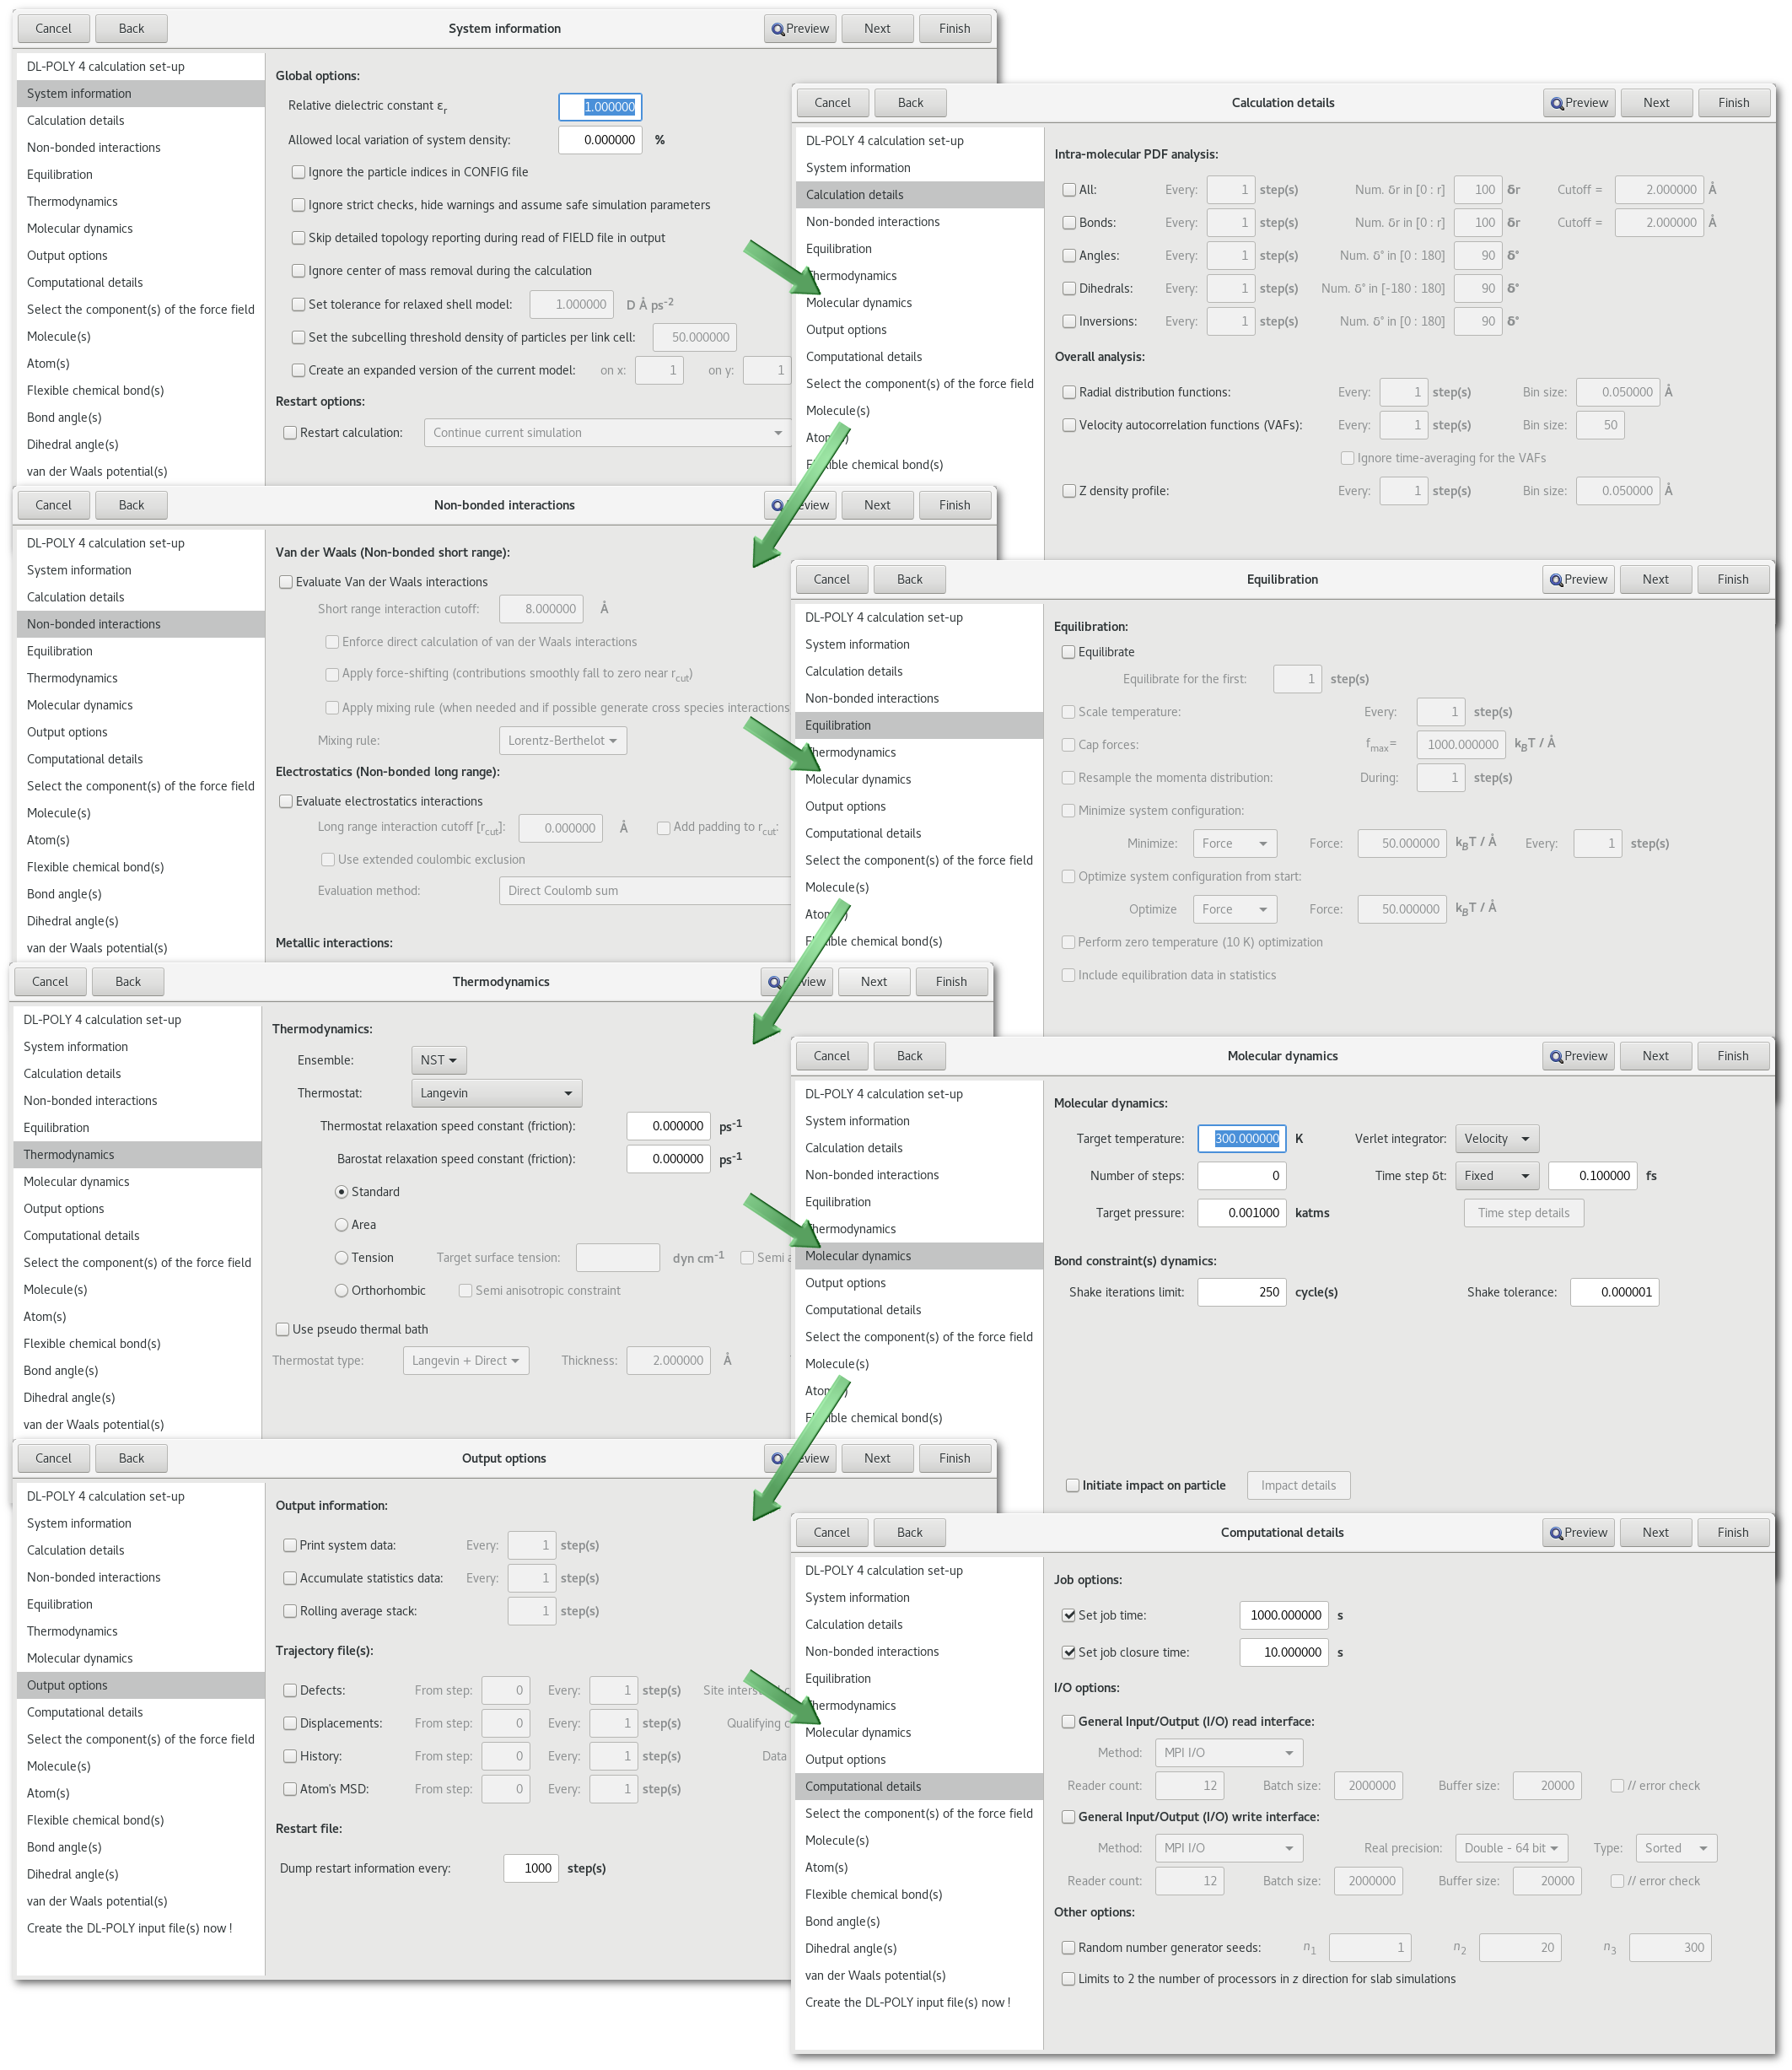
When the force field has been initialized and providing the "CONTROL" file is to be prepared, it is possible to adjust the corresponding options.
These options are regrouped in 8 tabs illustrated in figure 7.3, and almost all options from the DL-POLY user guide are available, with the exception of the Plumed calculation options and some options for the two-temperature "ttm" model.
The "FIELD" file
If the "FIELD" file is to be prepared then the corresponding tabs are also made available in the assistant.
Force field elements
The first tab related to the "FIELD" file allows to enable or disable all kind of component(s) for the force field to be created:
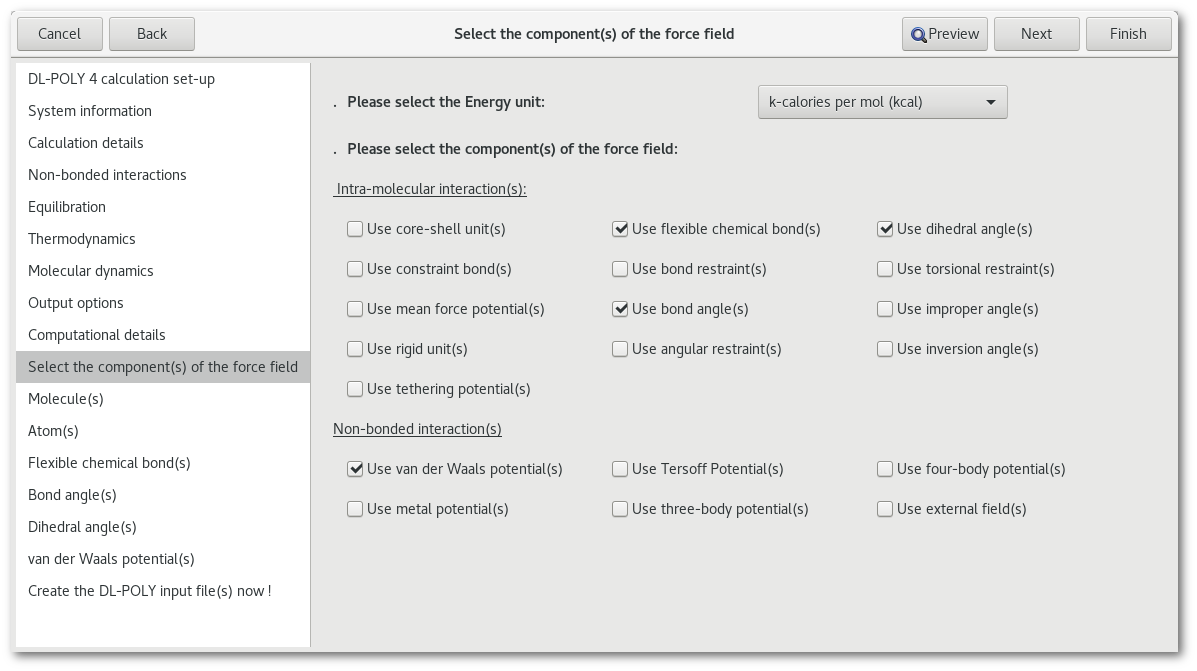
The "Energy unit" combo box, allows to change the energy units for the field parameters, please note that changing the energy unit will convert all parameters in the "FIELD" file to the new unit.
The other options are divided in 2 categories, the "Intra-molecular interaction(s)" options and the "Non-bonded interaction(s)" options. To enable / disable any feature simply check / uncheck the corresponding button in this tab, then the associated page will be inserted / removed from the list of pages available in the assistant.
General behavior of the "FIELD" file part of the assistant
Each page of the assistant is dedicated to a particular property, the first pages (up to 13 pages) being dedicated to intra-molecular interactions and the latest pages (up to 6 pages) being dedicated to non-bonded interactions.
Each page contains a table presenting the list of the associated properties, double clicking on a line with the mouse left button will allow to edit the corresponding line/property, while the mouse right button will open a contextual menu with different set of actions including the edition available otherwise.
For almost each and every intra or inter-molecular property listed in the corresponding tab, corresponds a "Use" check button. It is mandatory to check-in the "Use" button for the property to be used when building the "FIELD" (remember that few are mutually exclusive), if not then the information is simply stored for further usage.
Any objects selection is associated with a visualization in the model, ie. if an atom/a bond/an angle ... is selected then this object will be highlighted with a particular color in the 3D window, also the associated line in the selection dialog will be colored as well and using the same color.
Each page will be briefly introduced thereafter.
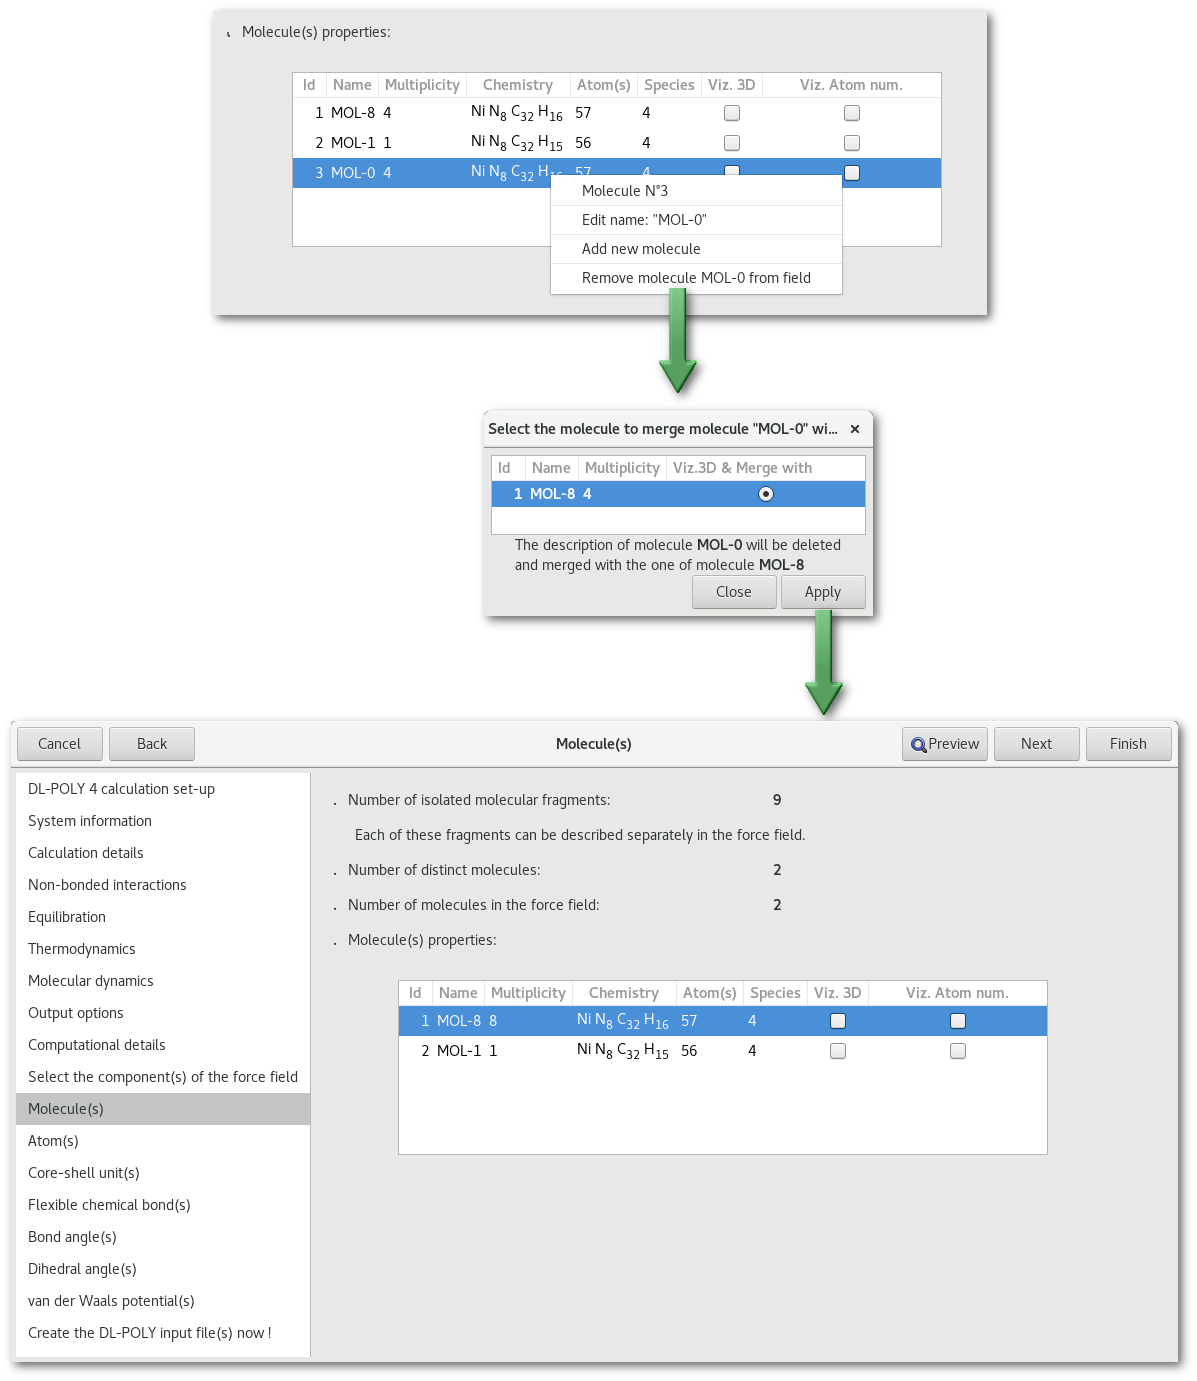
The "Molecule(s)" tab
The "Molecule(s)" tab, see figure 7.5, lists all the different molecules in the model:
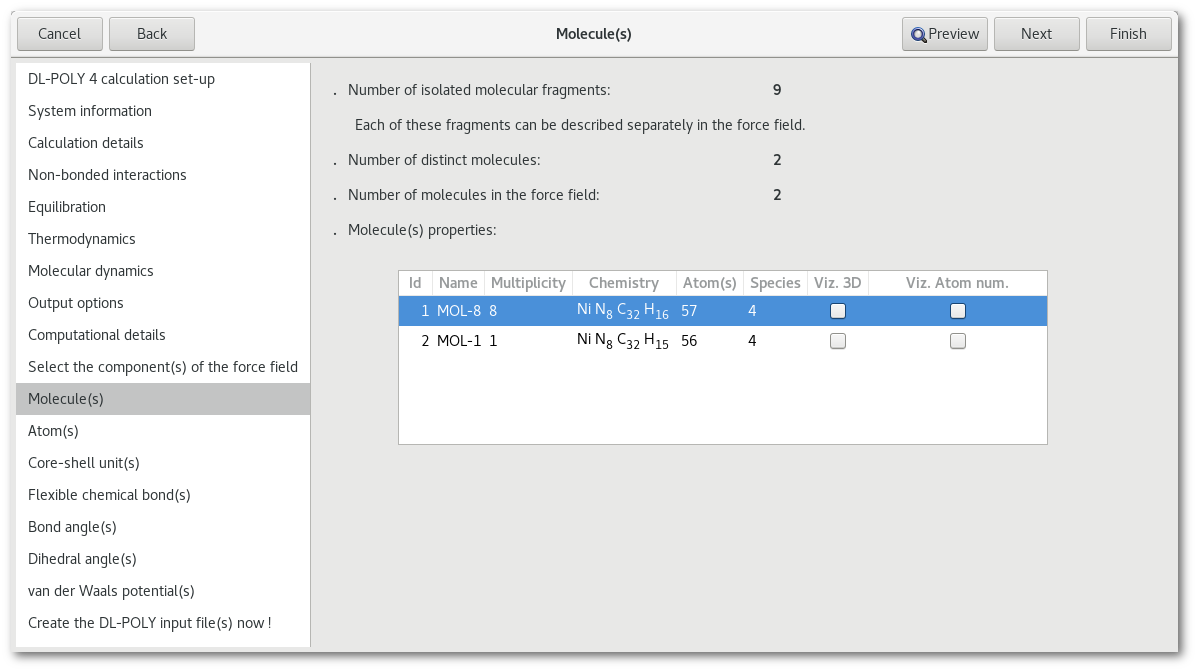
Each line corresponds to a molecule, and for each molecule the information is as follow:
ID in the force field
Name in the force field (can be changed by double clicking on the line)
Multiplicity (number of times the same molecule appears in the model)
Chemistry
Total number of atoms
Number of chemical species
Check button to visualize the molecule in the model
Check button to visualize the atom number within the molecule
In the "Ni-Phth" example used here, two distinct molecules are found, 8 identical and standard Ni-phthalocyanine molecules that constitute the bottom surface and 1 modified Ni-phthalocyanine molecule, with a H atom missing on top of it.
As illustrated in figure 7.6 the effect of the first check button [vizm] is to help visualizing the different molecule(s) in the model. For each molecule a color is defined and applied to both the atom(s) in the model and the corresponding line in the "Molecule(s)" tab.
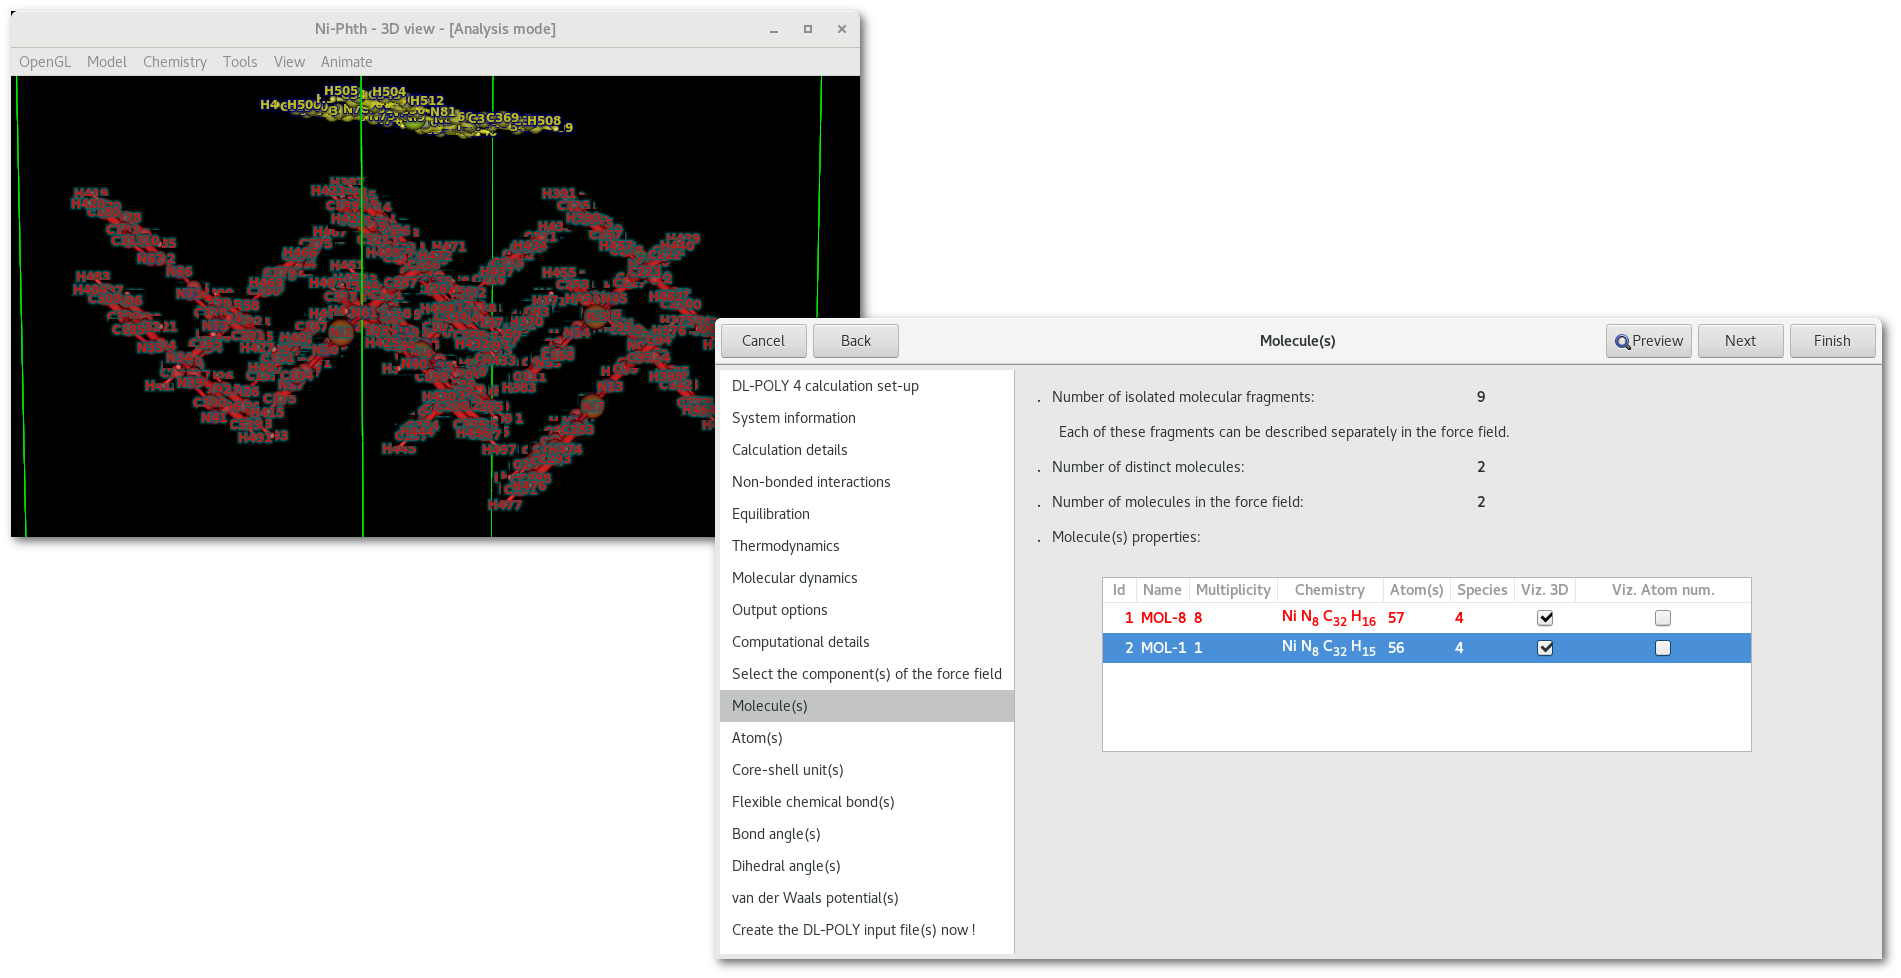
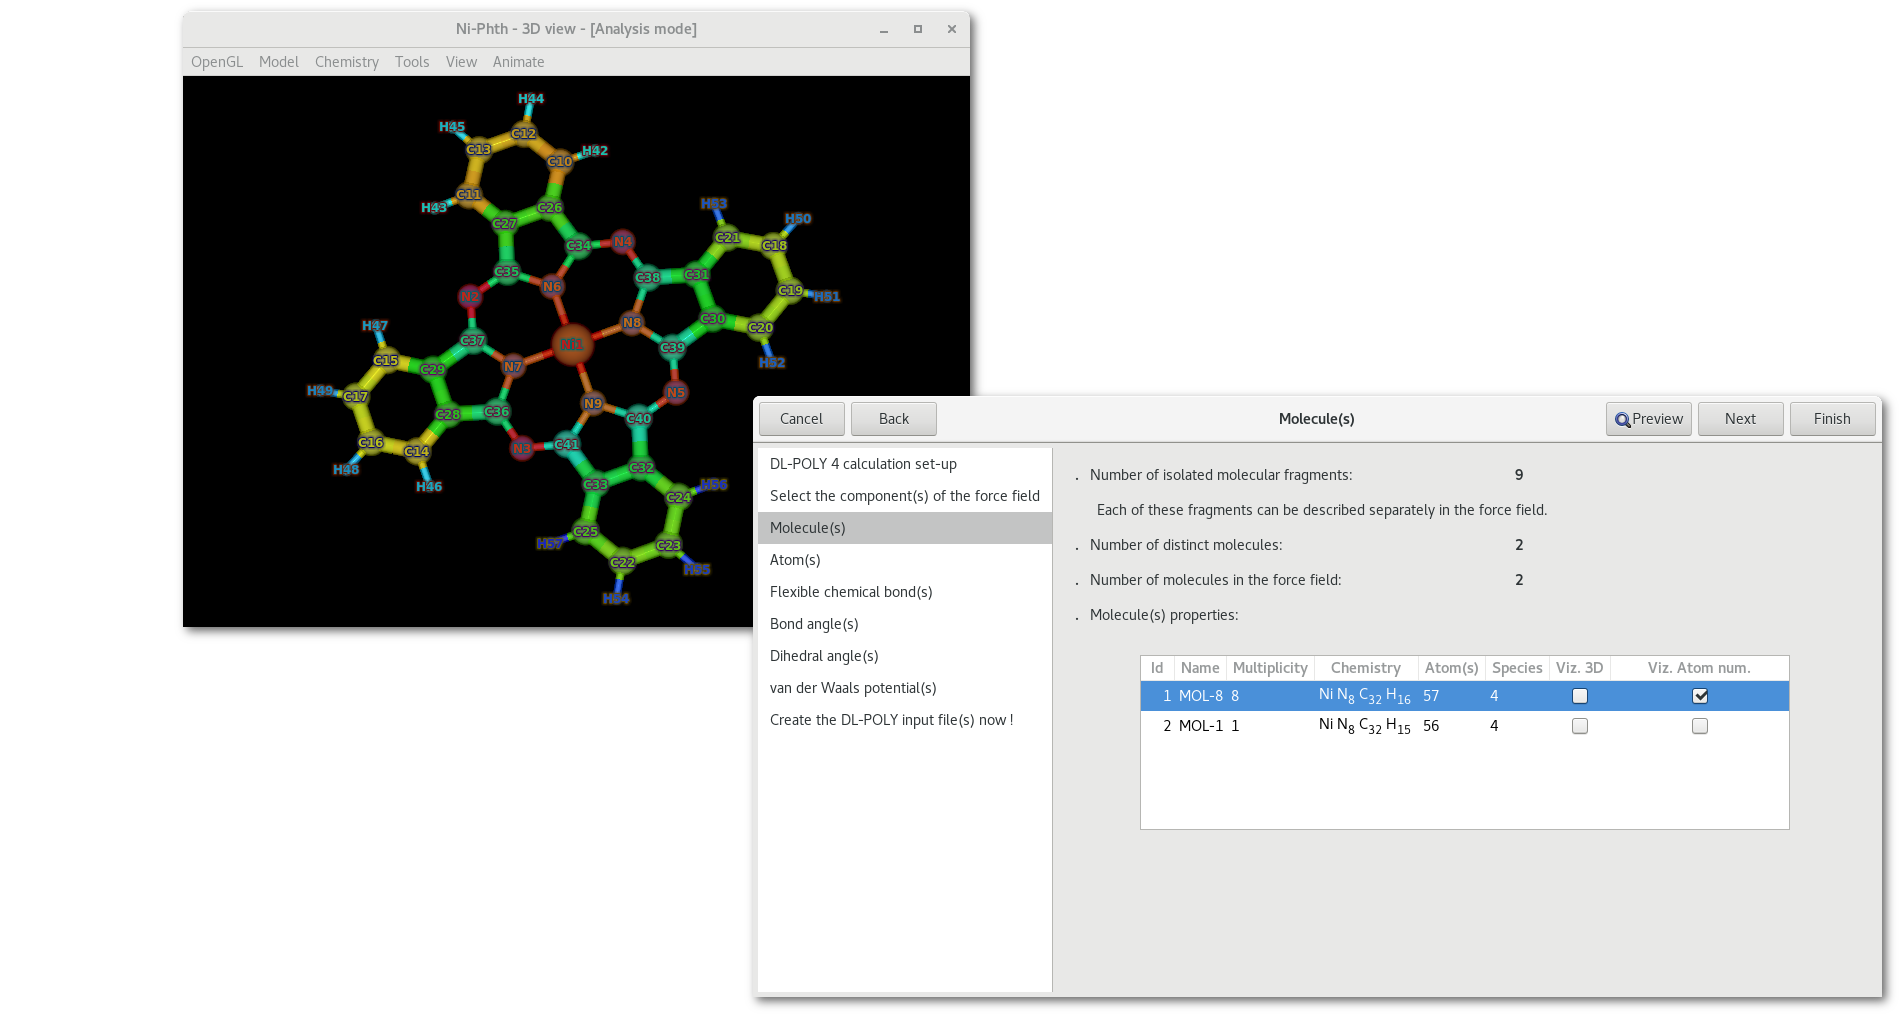
Whereas as illustrated in figure 7.7 the effect of the second check button [vizn] is to help visualizing the atom numbers as assigned in the "FIELD" file, numbers range from 1 to the total number of atom(s) in the molecule.
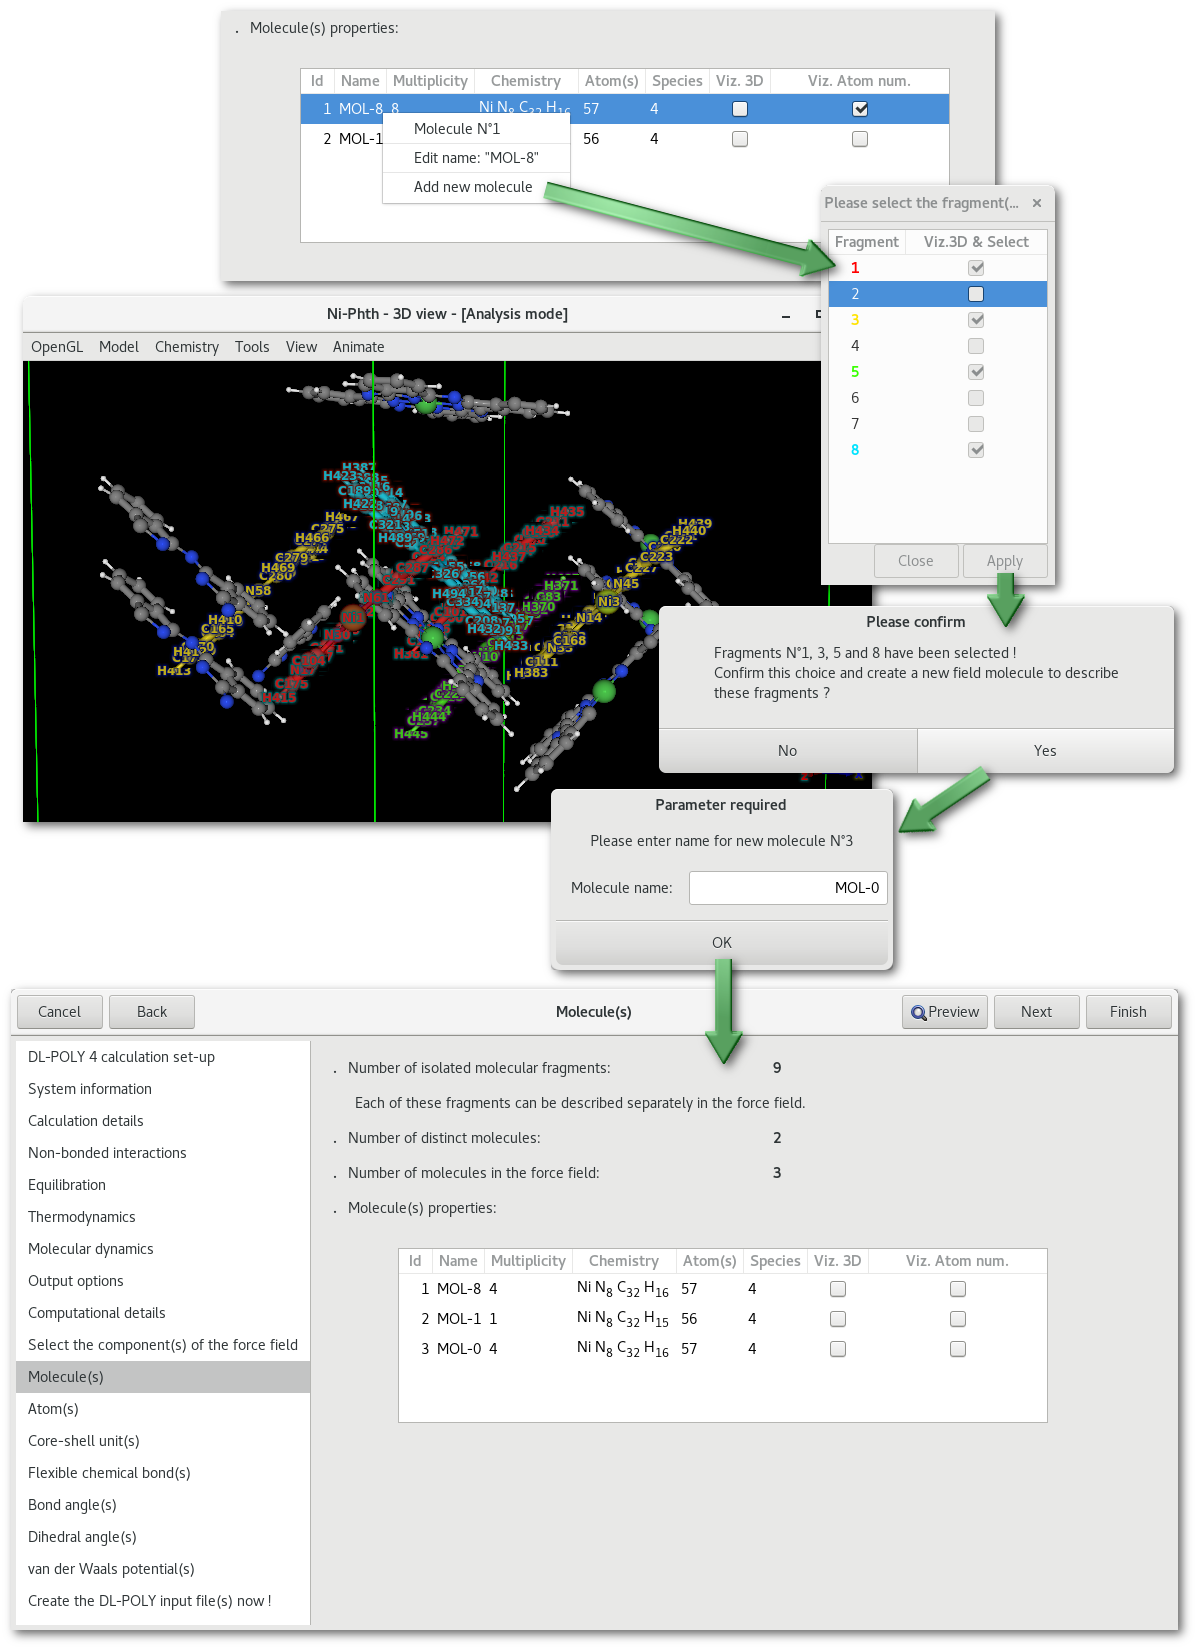
Some mouse options are available in the "Molecule(s)" tab:
Double click anywhere on the line to edit the name of the molecule.
Use the right click to open the contextual menu to edit the name/add/remove molecule(s).
As illustrated in figures 7.8 and 7.9 it is possible to add molecule(s) to the force field, or to merge existing molecules from the force field into a single description:
Providing that the multiplicity of a molecule is higher than 1, and therefore than several identical molecular fragment exist, it is possible to split the existing molecule, preserving the old description for the non-selected fragment(s) and creating a copy for the selected fragment(s). This process is illustrated in figure 7.8.
Providing that some molecules in the force field have the same chemistry and connectivity it is possible to merge the description this two separates molecules as one. This process is illustrated in figure 7.9.
The "Atom(s)" tab
When molecules have been properly defined, the next tab allows to configure the atom(s) description, this has to be done for each molecule:

As illustrated in figure 7.10 the first element to notice in the "Atom(s)" tab is the combo box for the choice of the molecule to work on, that same combo box will be inserted in any tab dedicated to intra-molecular interactions.
Each line corresponds to a particular atom for the molecule specified above, and for each atom the information is as follow:
ID in the molecule
Name in the molecule
Element
Mass
Charge
Number of frozen atoms for this type
Total number of atoms for this type
Check button to visualize the atom in the model
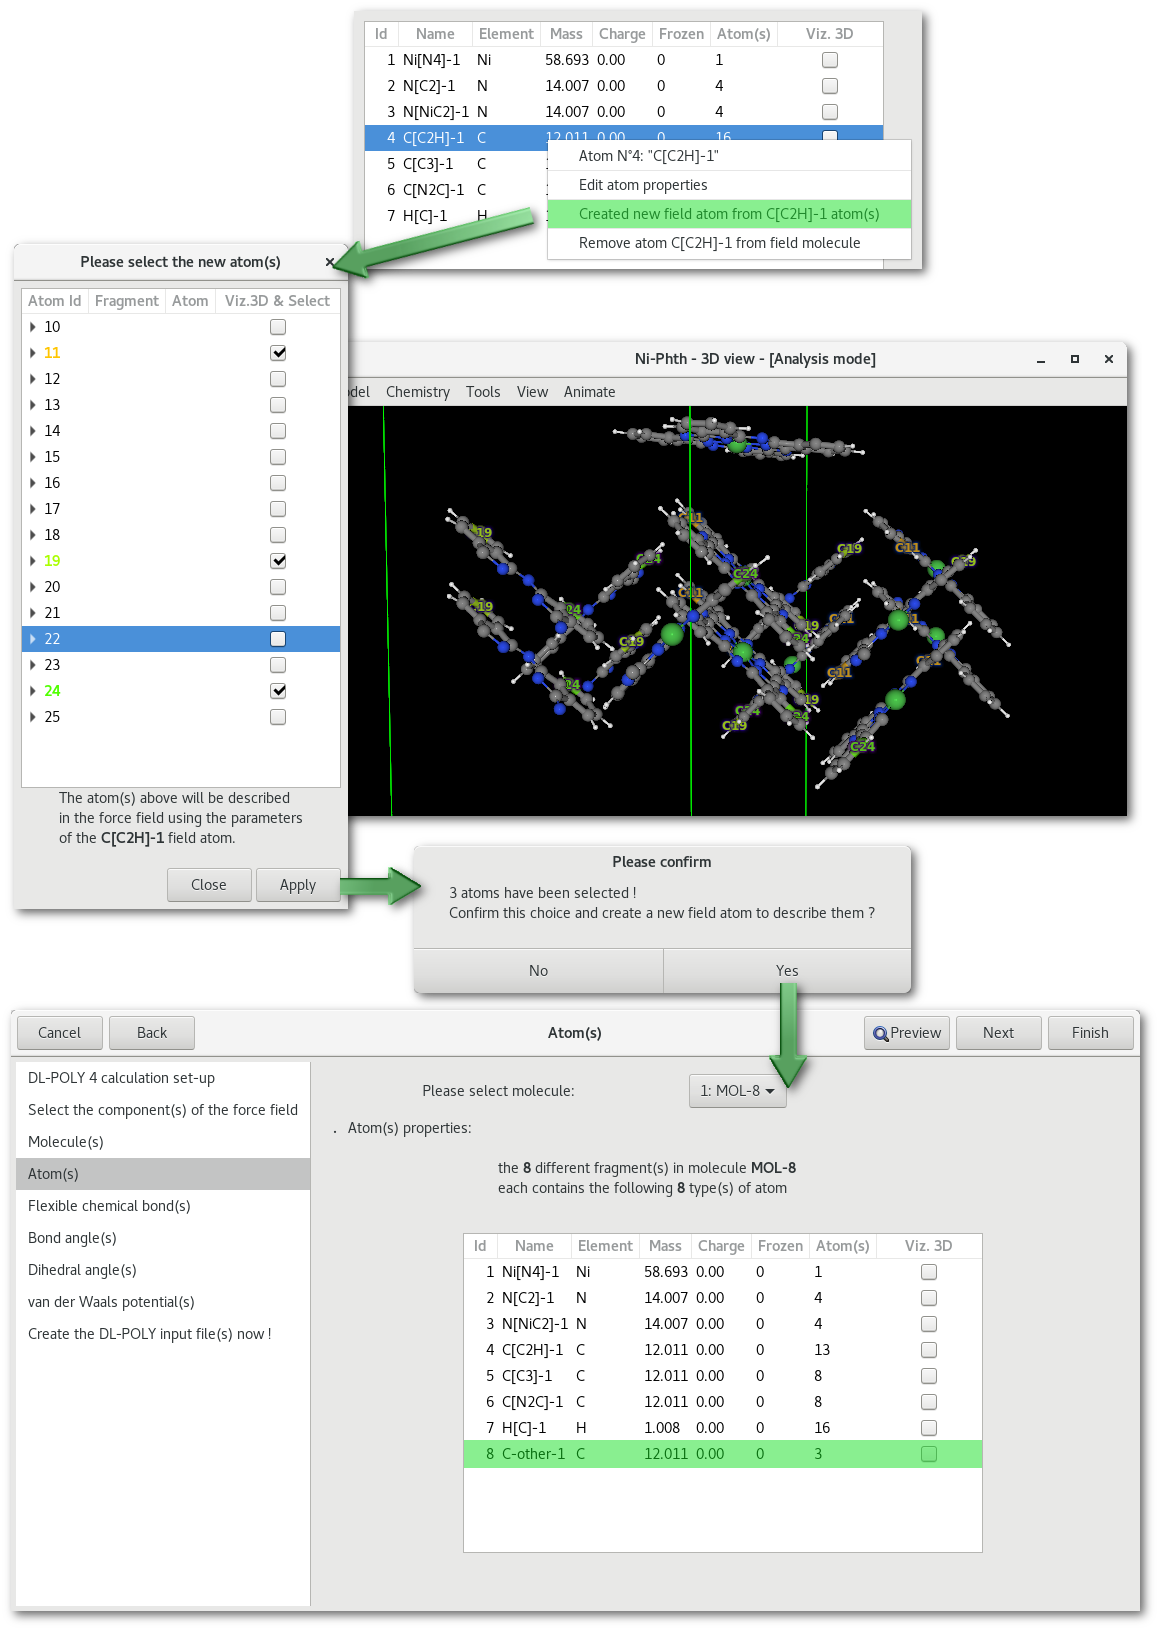
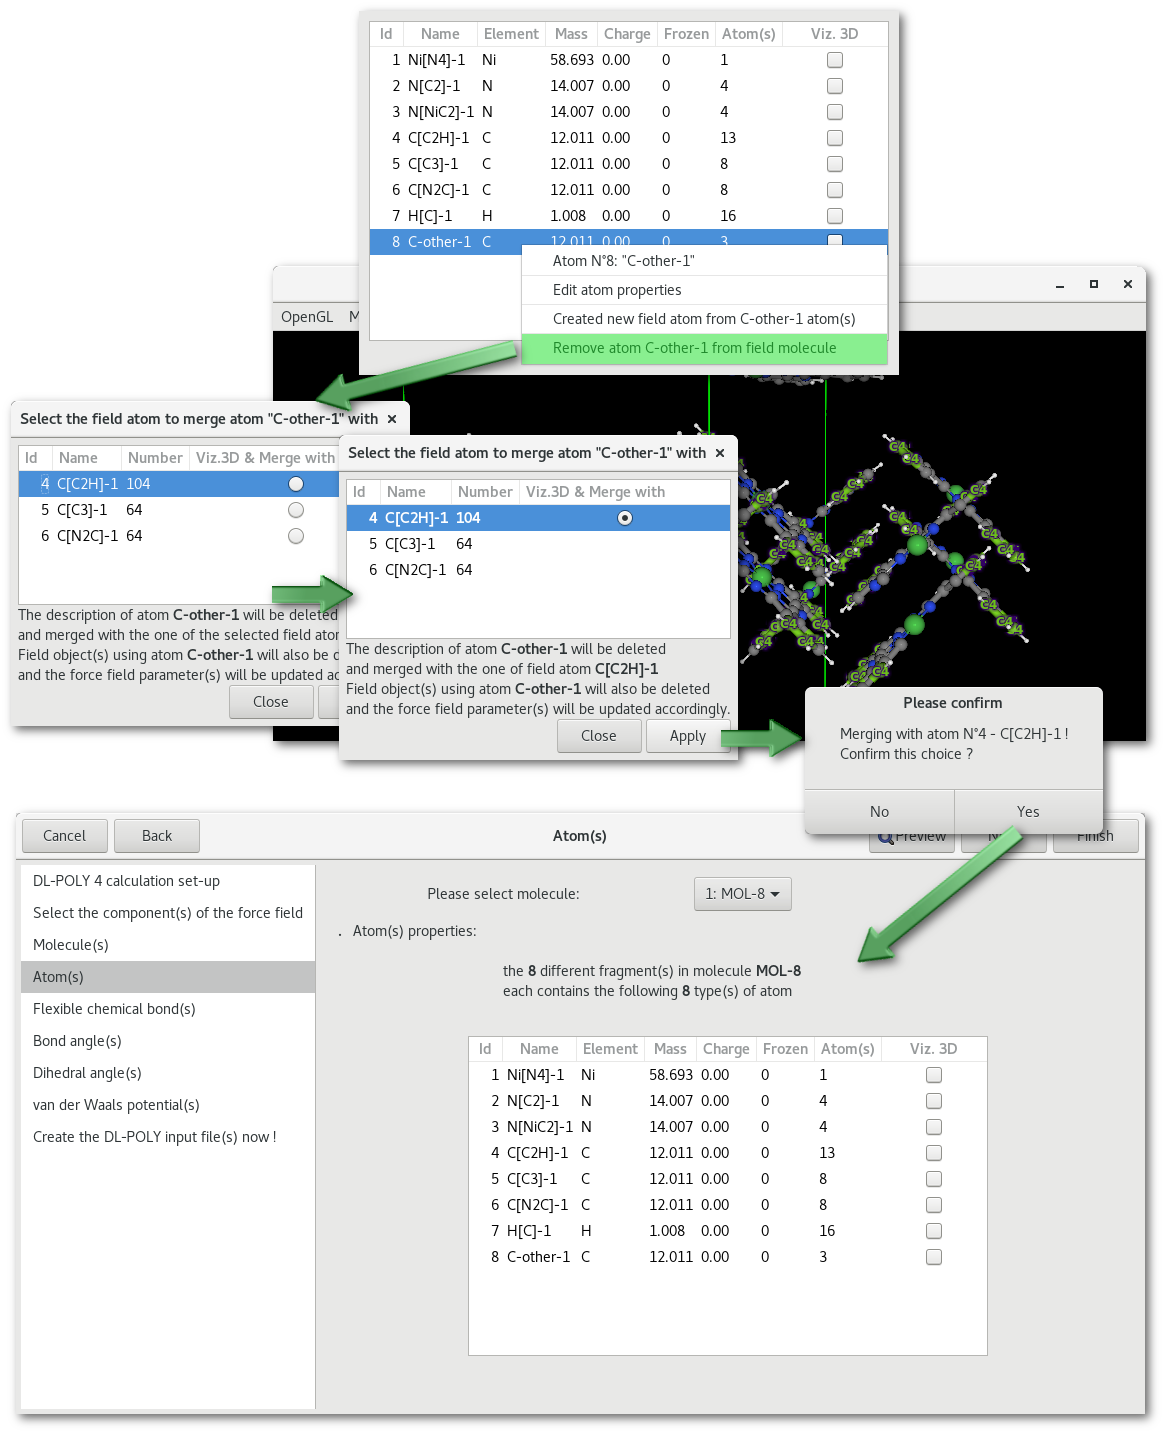
Before editing an atom property it might be necessary to add or remove some atom types from the existing description, these actions are available using the mouse right button contextual menu. As illustrated in figure 7.11 it is possible to create a new type of atom from an existing atom type that contains more that 1 atom. And as illustrated in figure 7.12 it is possible to merge an existing atom description with any other atom type of the same chemical species. Whether it is for inserting or merging an atom it is important to specify that all existing atomic descriptions, a part for the new one or the one to be removed, will be preserved and thus that no information will be lost in this process.
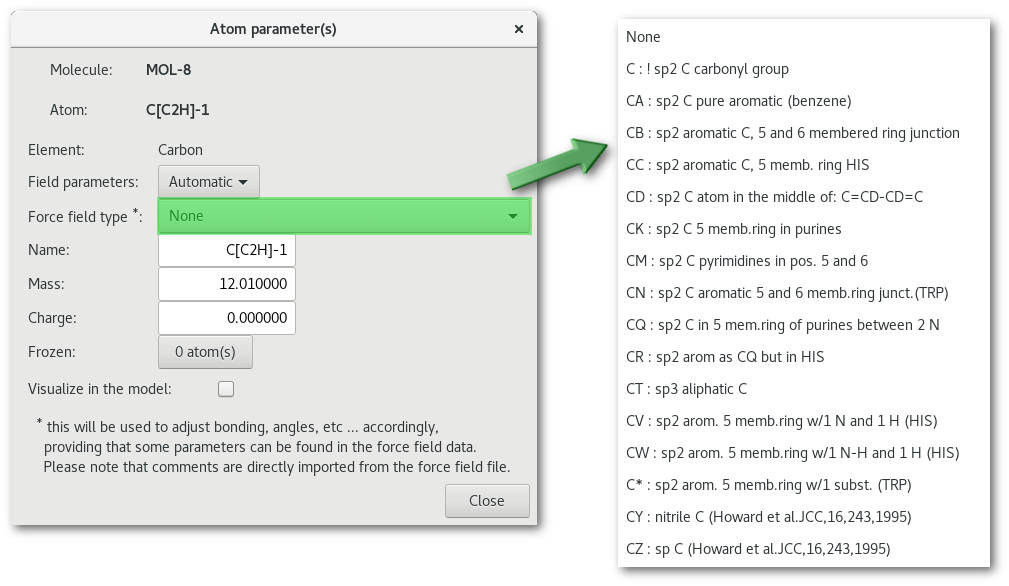
Editing an atom properties, by double clicking on the atom line or using the contextual menu, will open the "Atom parameter(s)" dialog:
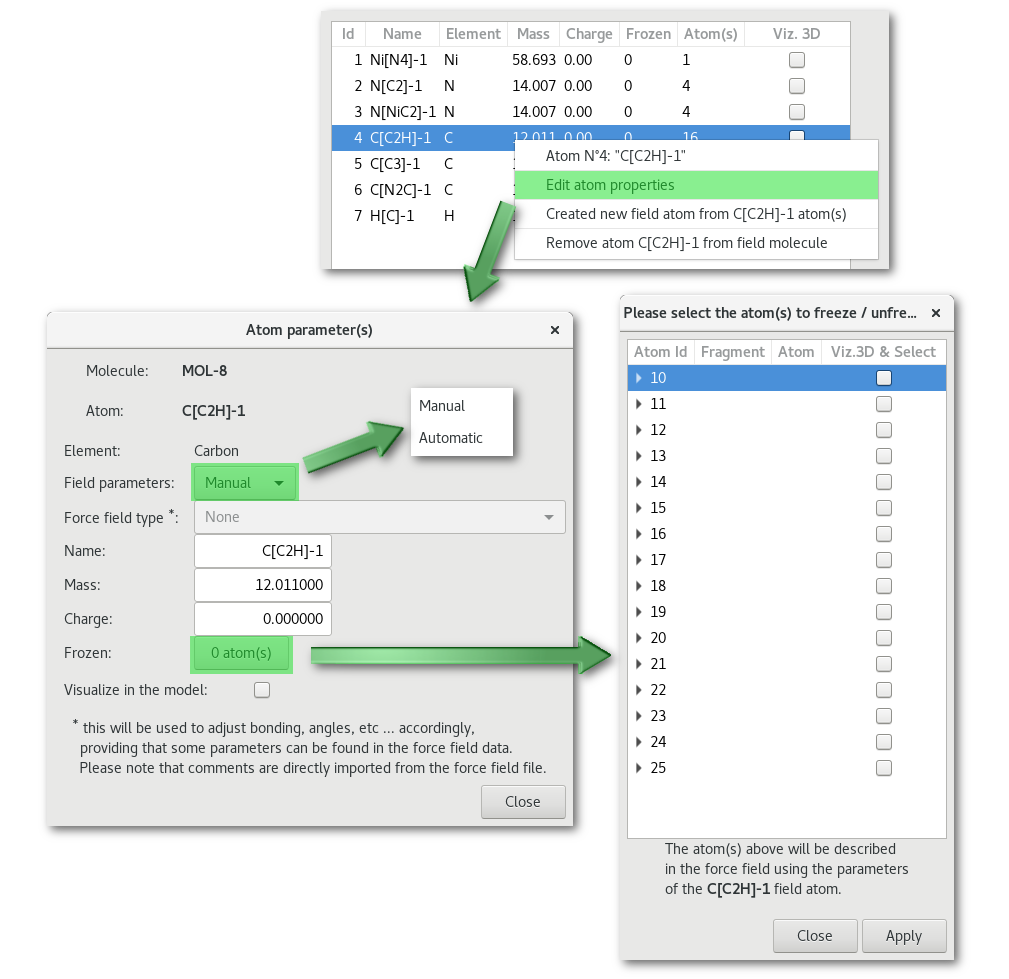
The "Field parameters" combo allows to switch between "Manual" (user defined only) and "Automatic" force field parameters (if any available). By default the choice is set on "Manual" and the "Force field type" combo is inactive. The "Frozen" button allows to pick atom(s) to be frozen among the edited atom type (see figure 7.13). When selecting "Automatic" for the "Field parameters" combo, providing that some force field parameters are found "Force field type" combo becomes active and offers to choose between available description(s):
As soon as a selection has been made a dialog (see fig. 7.15) pops up to update the "FIELD" file with the available parameters in the force field selected at the initializing stage of the assistant (Amber 99 in this example).
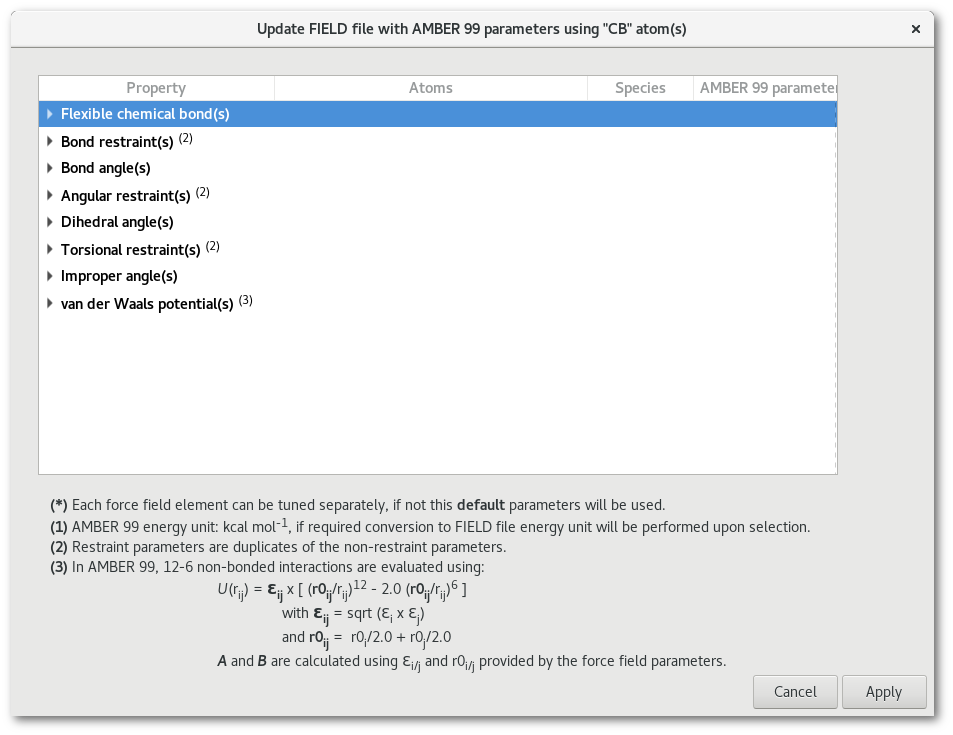
The number of lines in the table in figure 7.15 depends on both the option(s) ("Flexible chemical bond(s), Bond angle(s) ...") selected to create the "FIELD" file, the line will appears only if the option was selected, and the availability of the data for that particular type of atom in the selected force field. In this example all the properties presented were selected to create the "FIELD" file and some data exist in the force field for the "CB" atom type with each particular property. This dialog helps to update quickly any parameters to be used to create the "FIELD" file:
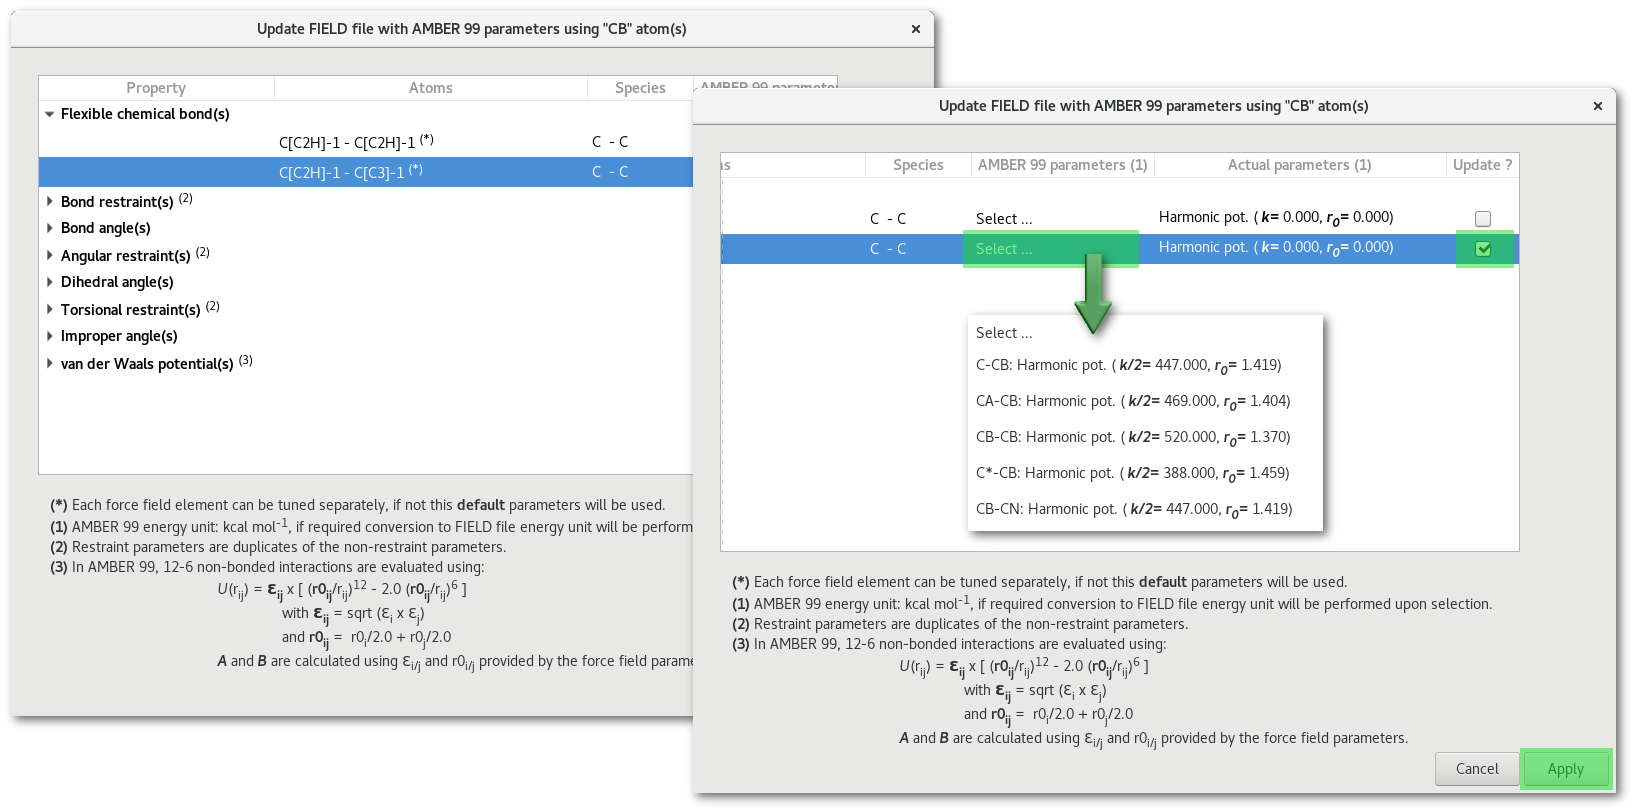
As illustrated in figure 7.16 to update any "FIELD" file value simply browse the property tree, select the desired force field parameters among available data, remember to check the "update" button at the end of the line, and finally pressed the "Apply" button.
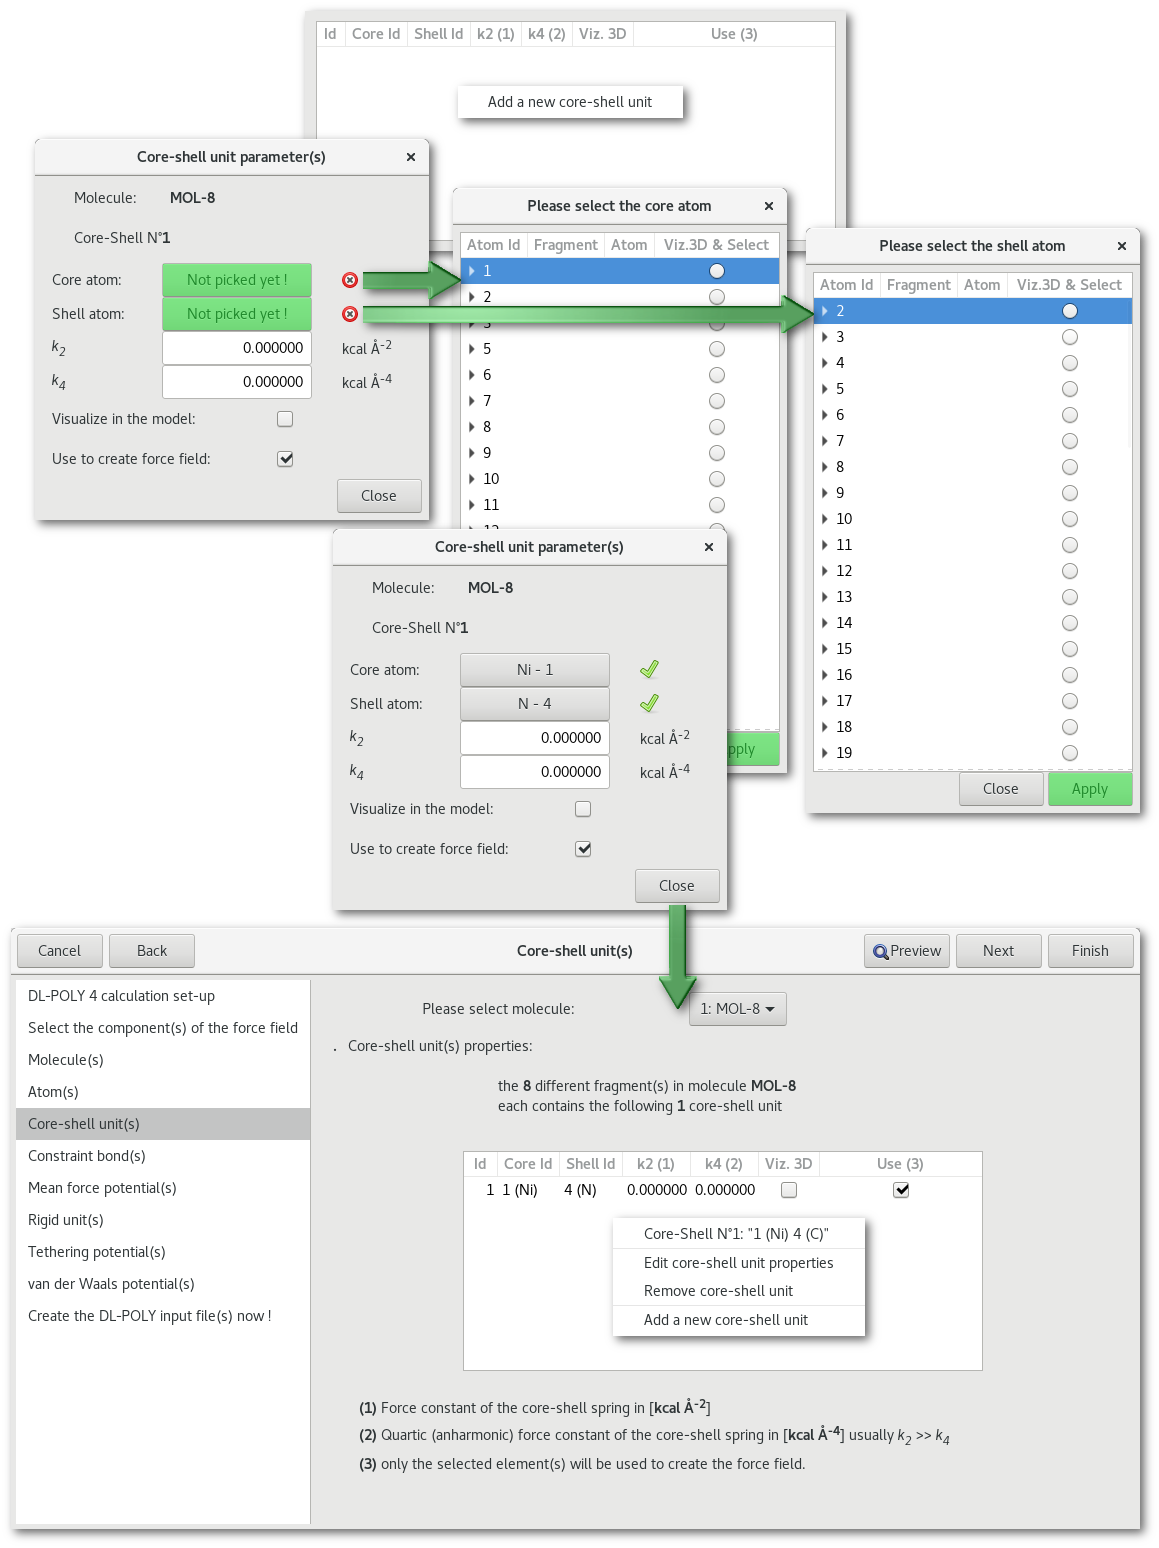
"Core-shell unit(s)"
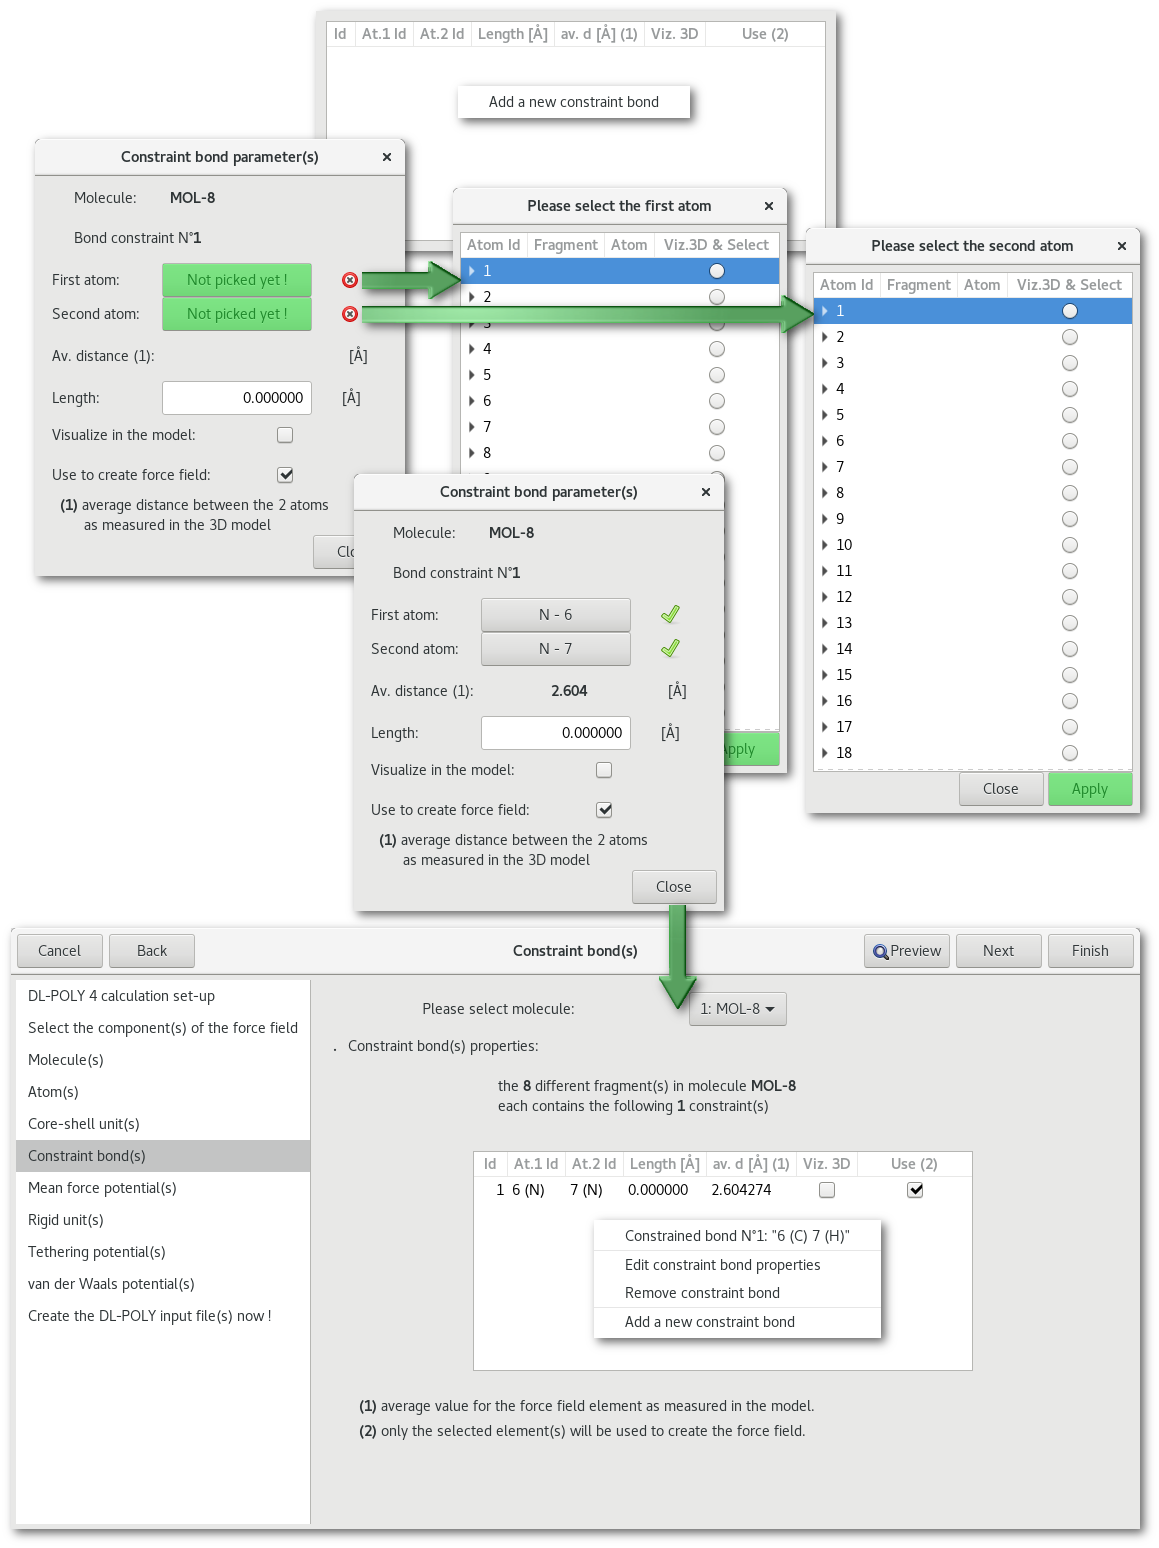
"Constraint bond(s)"
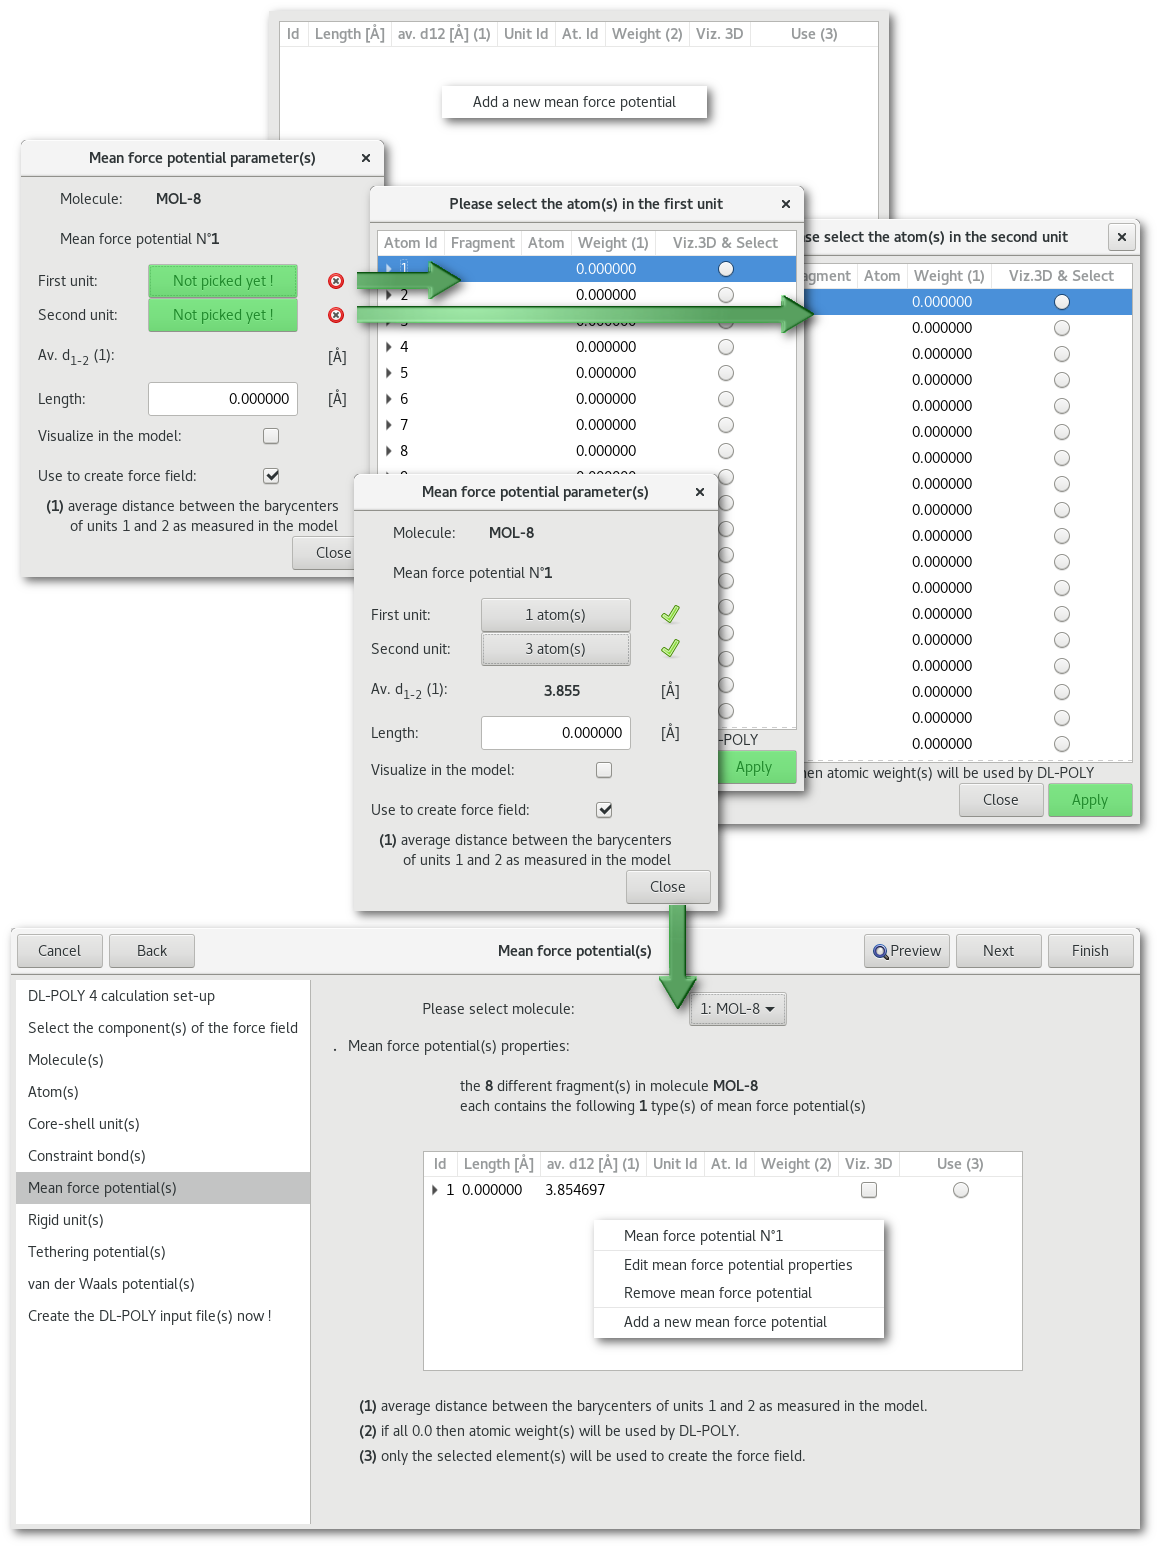
"Mean force potential(s)"
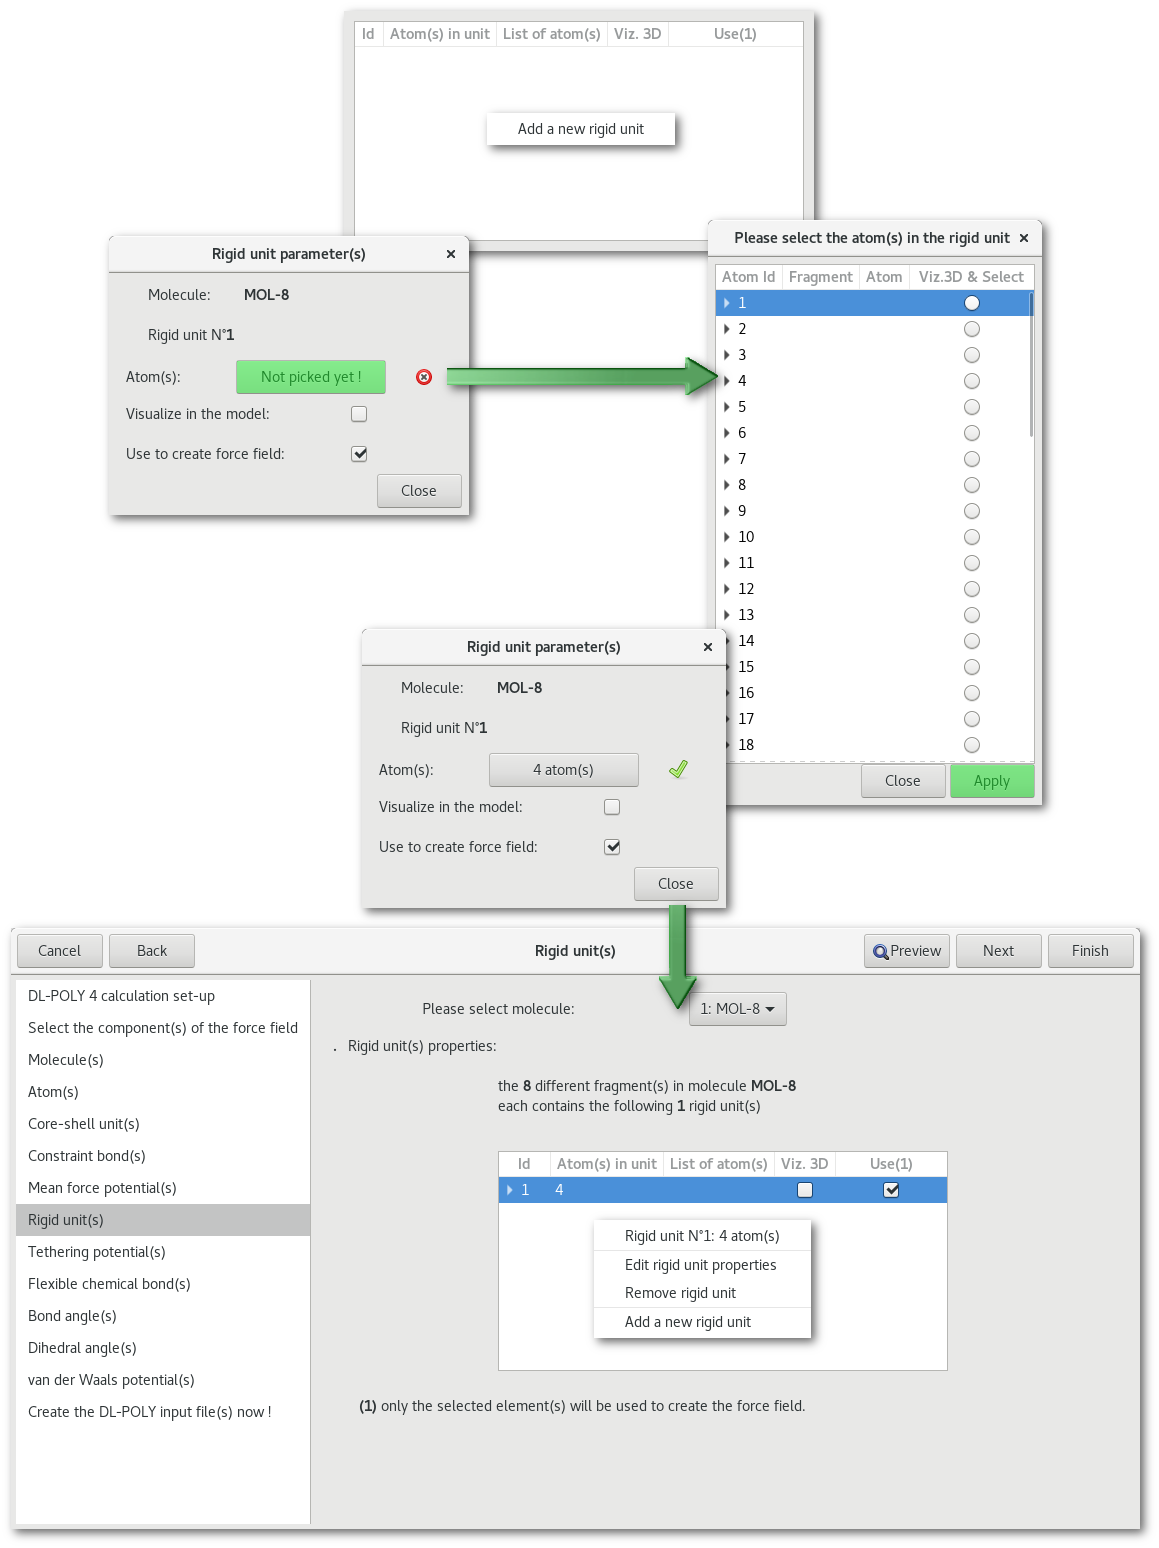
"Rigid unit(s)"
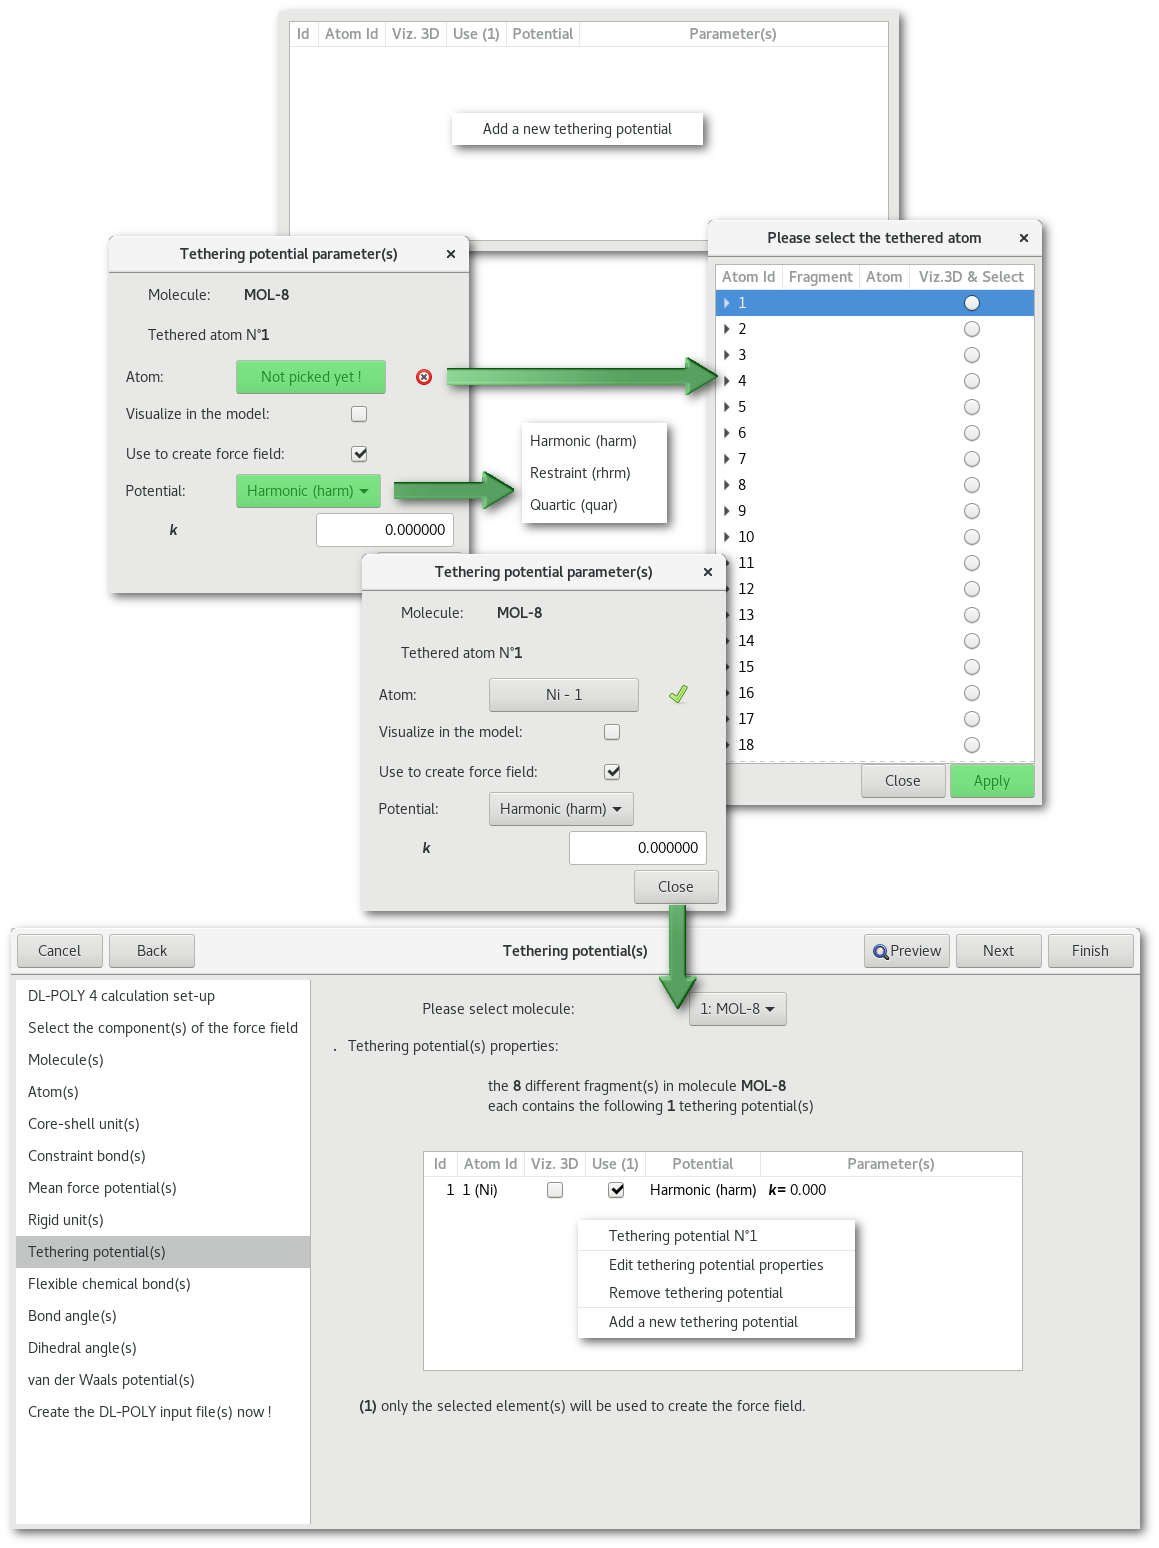
"Tethering potential(s)"
"Flexible chemical bond(s)" and "Bond restraint(s)"
The tabs for the "Flexible chemical bond(s)" and the "Bond restraint(s)" being extremely similar, this manual presents only the part related to "Flexible chemical bond(s)".
As illustrated in figure 7.22 the bonds, for the selected molecule, are listed by type depending on the nature of the field atoms involved, also for each type of bond it is possible to display every single bond in the molecule.
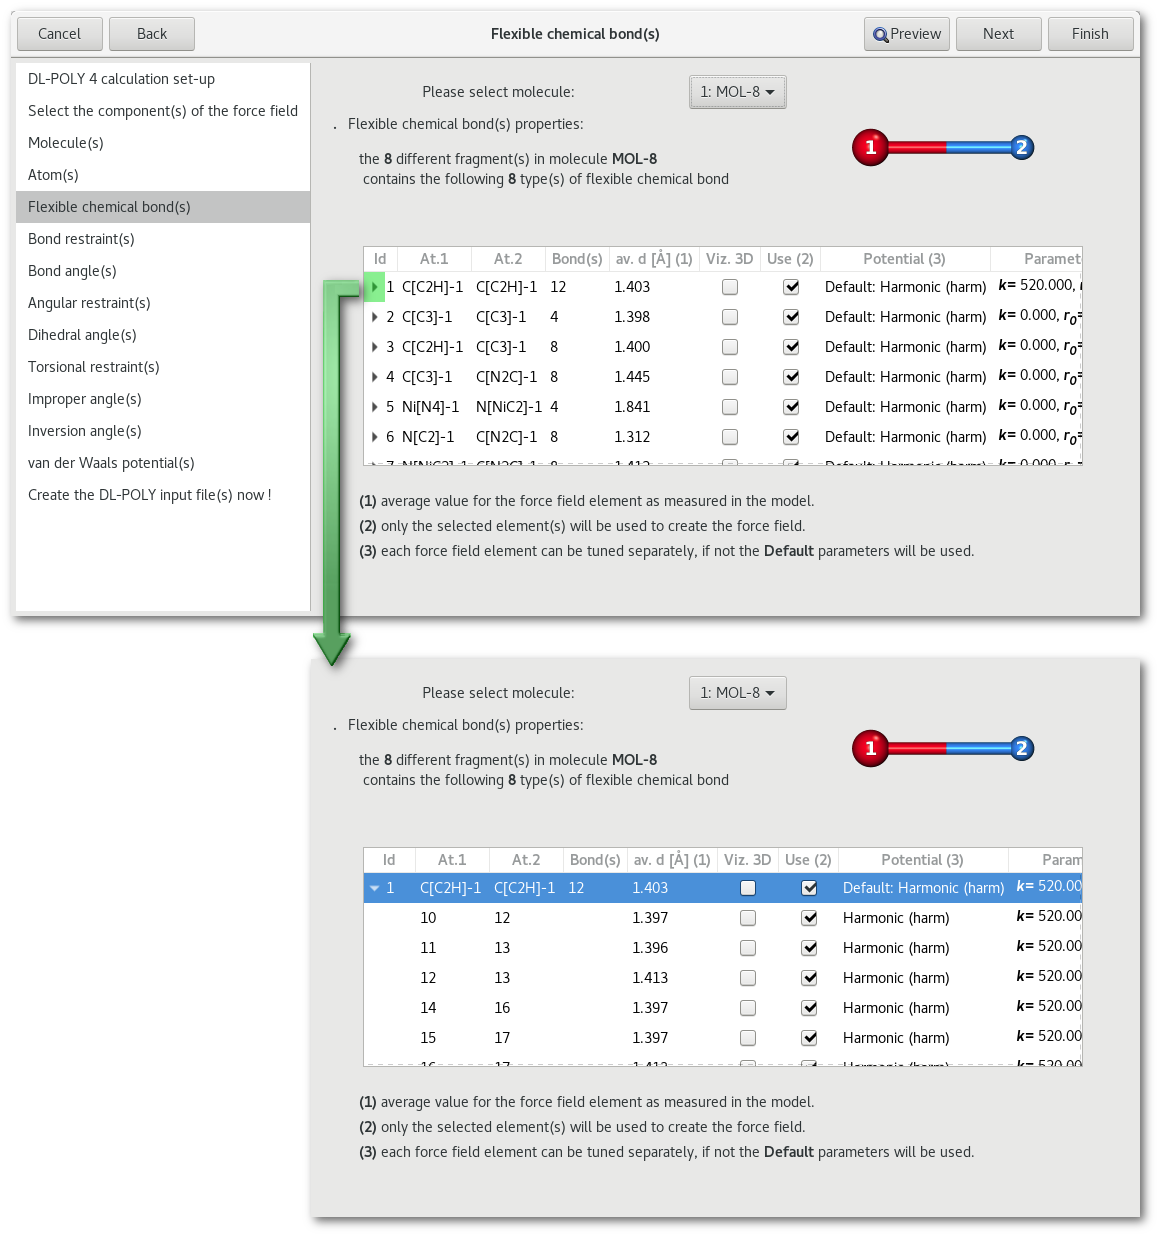
Each line corresponds to a either to a bond type, or a particular bond, for the molecule specified above, and for each bond the information is as follow:
ID in the molecule (if the line refers to a bond type).
Name for atom type 1 (bond type), or field number for atom 1 (bond).
Name for atom type 2 (bond type), or field number for atom 2 (bond).
Value measured in the model: average for all bonds for that type, or, value (or average if the multiplicity for the molecule is > 1) for that particular bond.
Visualize all bonds of that type or that particular bond in the model.
Use to create the "
FIELD" file, if not checked the bond / type will not be used.Potential to use to describe all bonds of that type ("
Default:" value) or that particular bond in the model.Numerical value(s) for the parameters of the selected potential.
The description of the bond(s) can be modified simultaneously for all bond(s) of the same type using the root line that type, or one by one by browsing the list and picking any line. It is therefore possible to choose a different parametrization for every single bond in the molecule. Some parameters can be modified directly in the table, otherwise a simple double click using the mouse left button will open the bond edition dialog illustrated in figure 7.23.
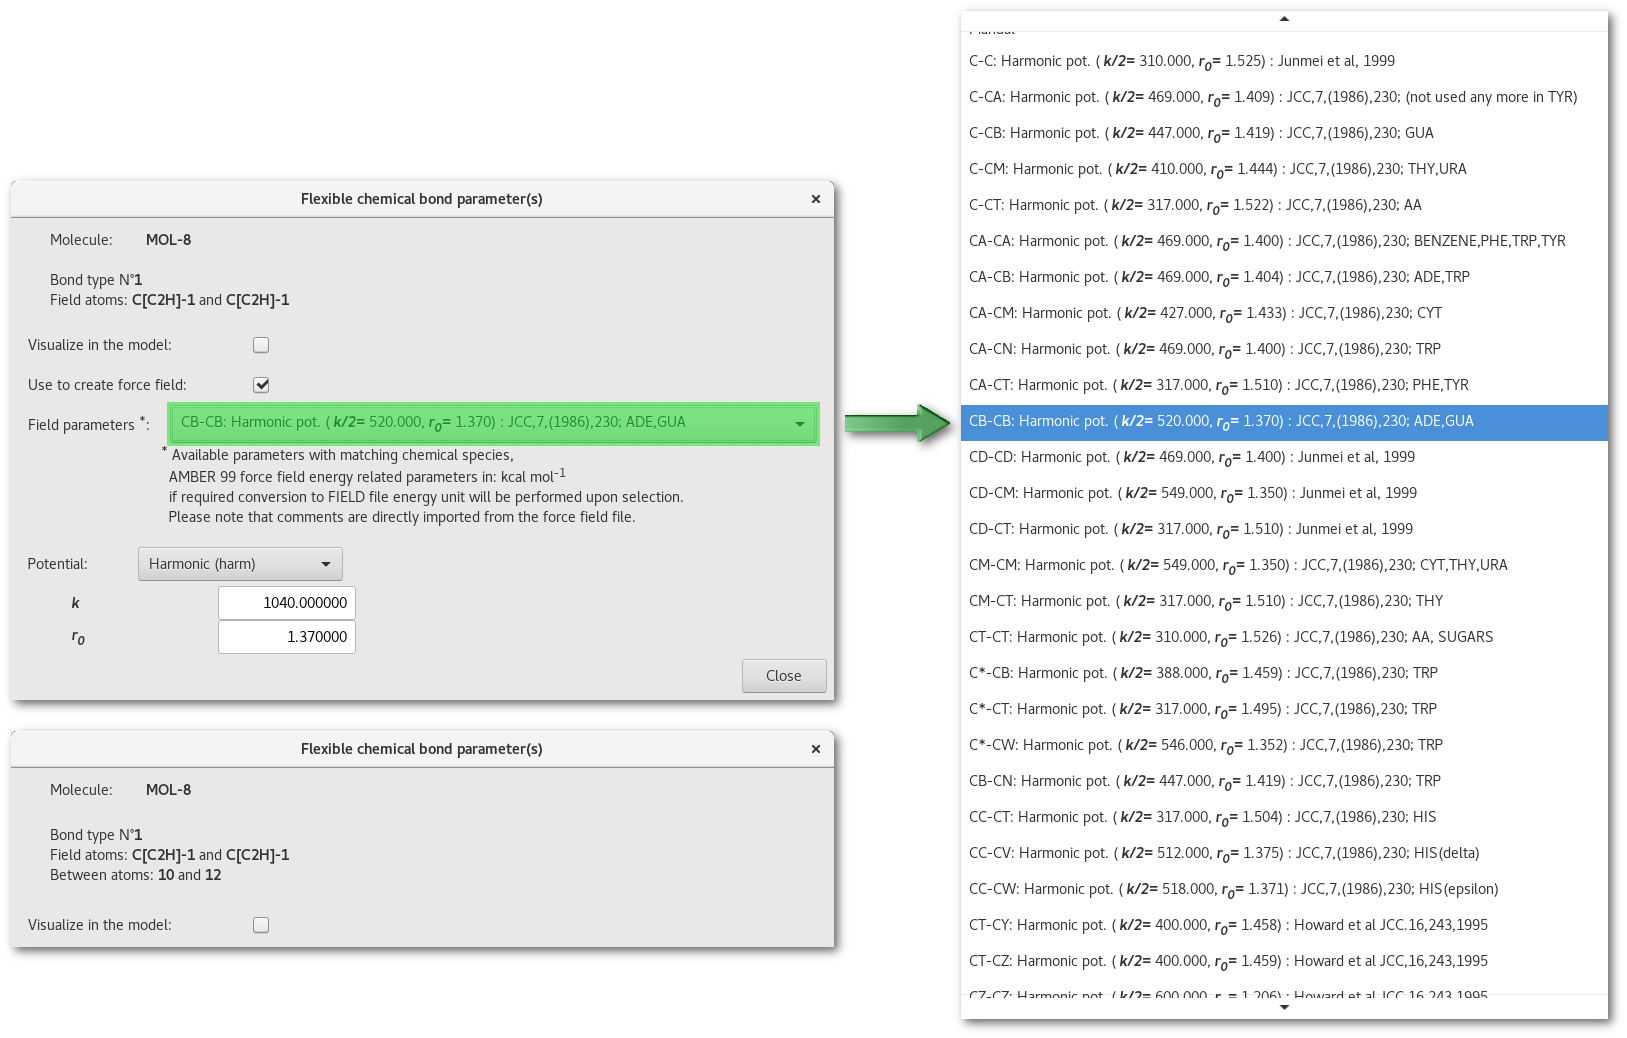
In figure 7.23 the "Field parameters" combo box presents the list of matching parameters, chemical species wise, found in the force field selected at the initialization stage.
The next tabs of the assistant dedicated to intra-molecular properties are as follow:
"
Bond angle(s)""
Angular restraint(s)""
Dihedral angle(s)""
Torsional restraint(s)""
Improper angle(s)""
Inversion angle(s)"
For all these properties the philosophy is similar to the one presented above for the "Flexible chemical bond(s)". Hence will only briefly illustrate the different tabs without more details.
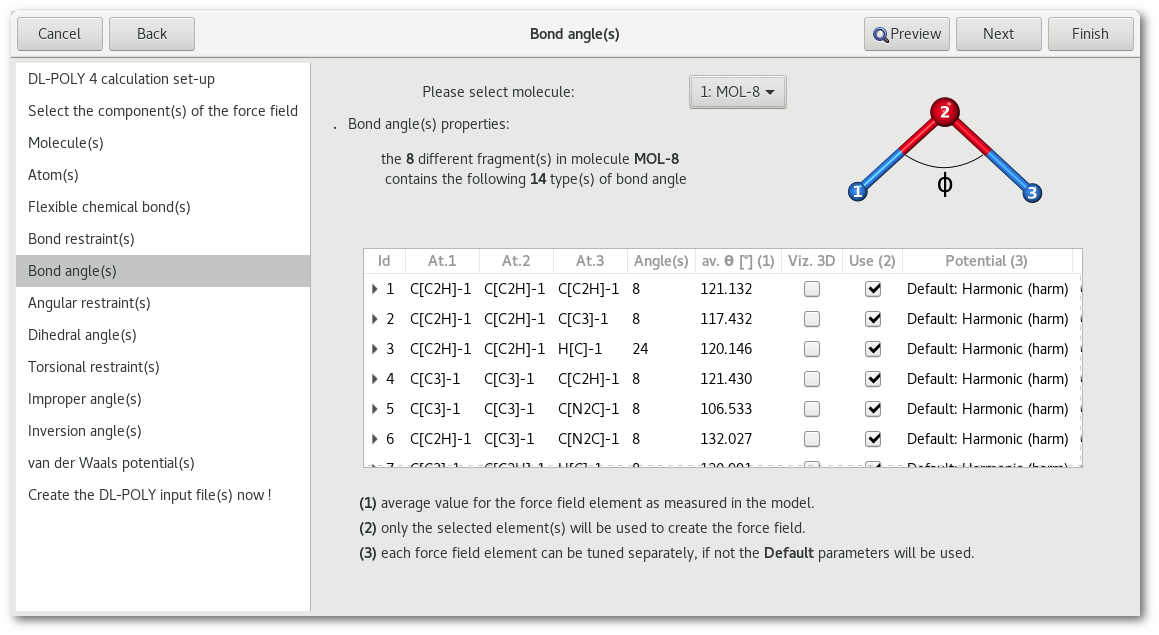
"Bond angle(s)" and "Angular restraint(s)"
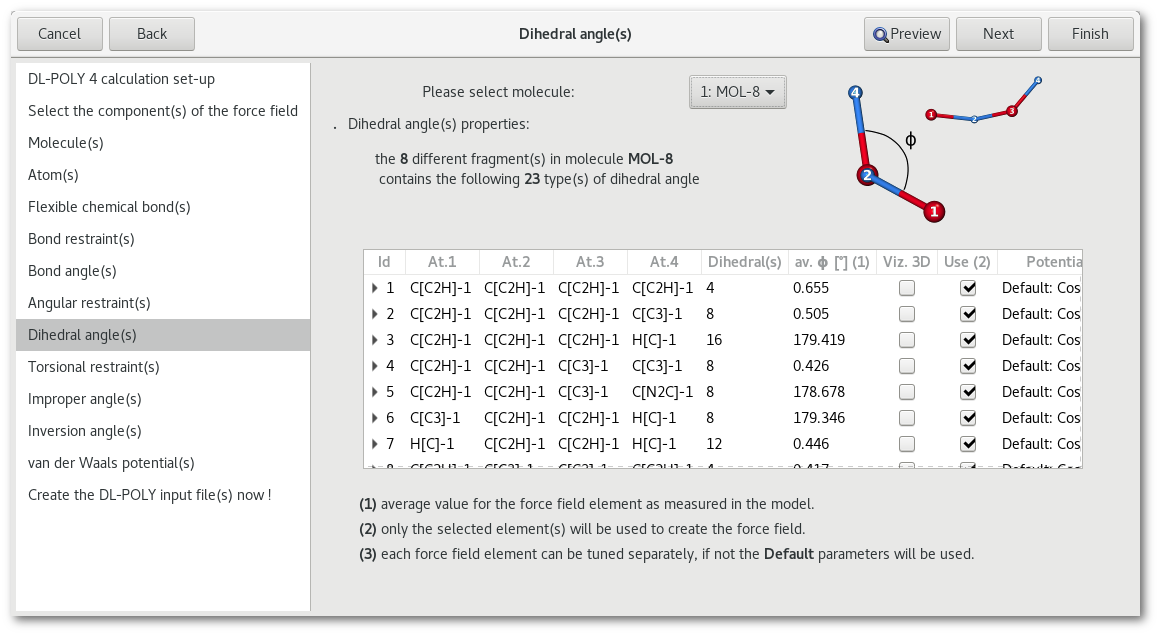
"Dihedral angle(s)" and "Torsional restraint(s)"
"Improper angle(s)"

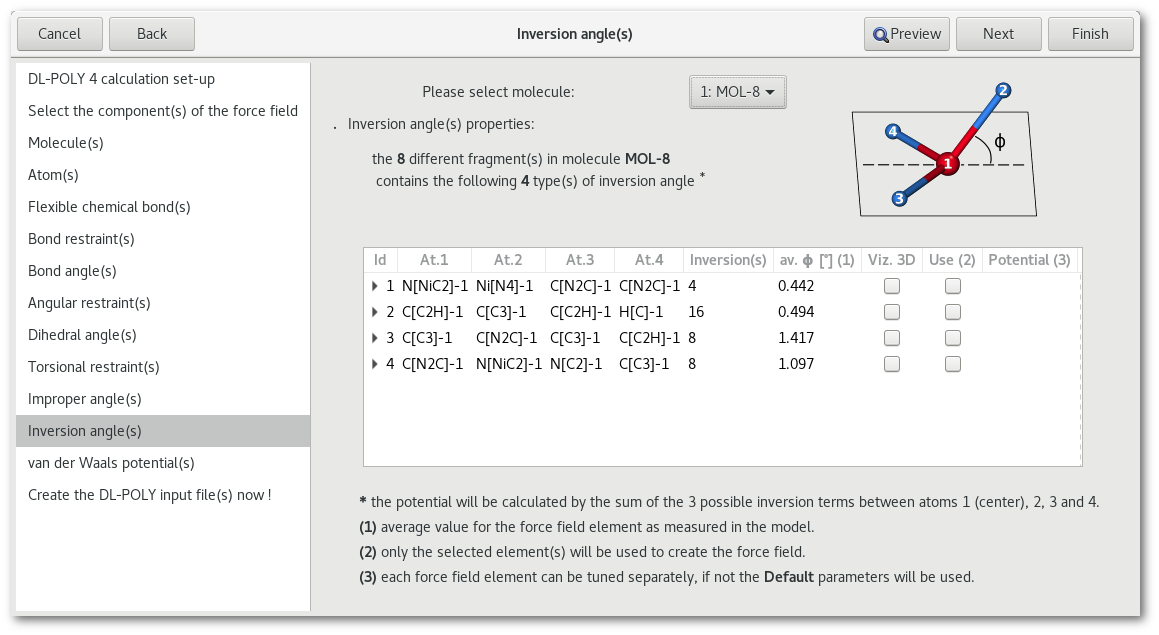
"Inversion angle(s)"
"van der Waals potential(s)"

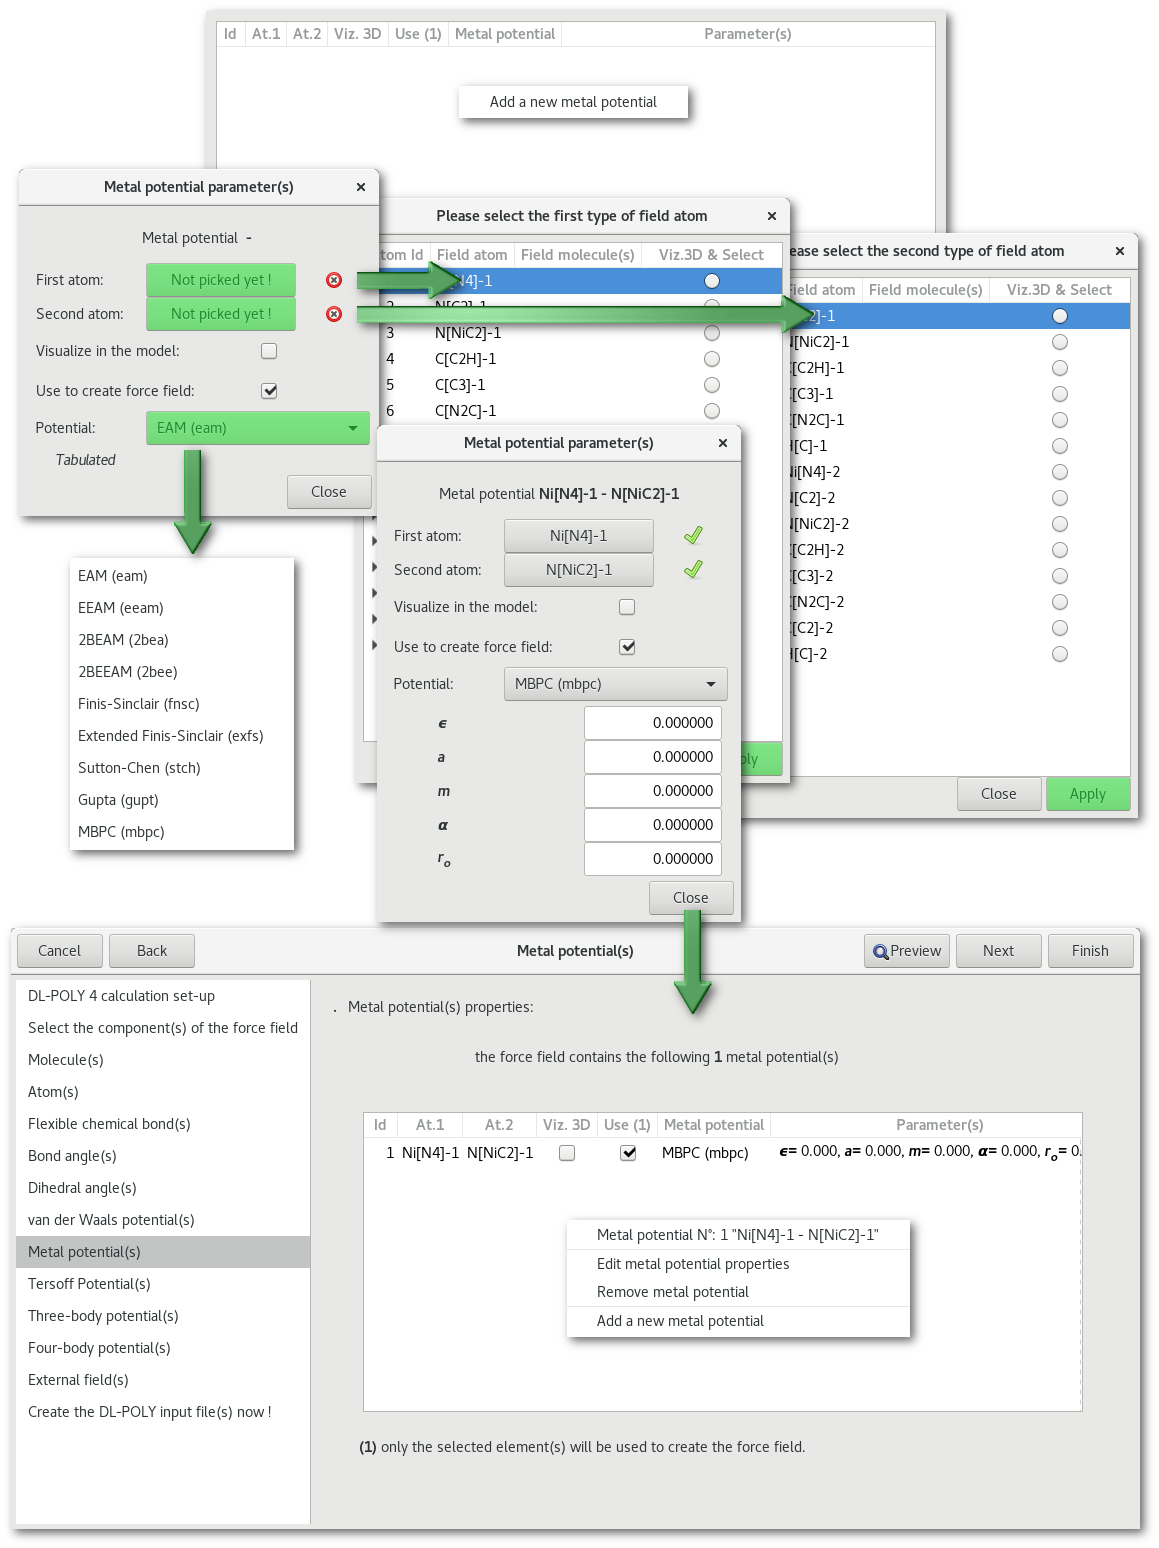
"Metal potential(s)"
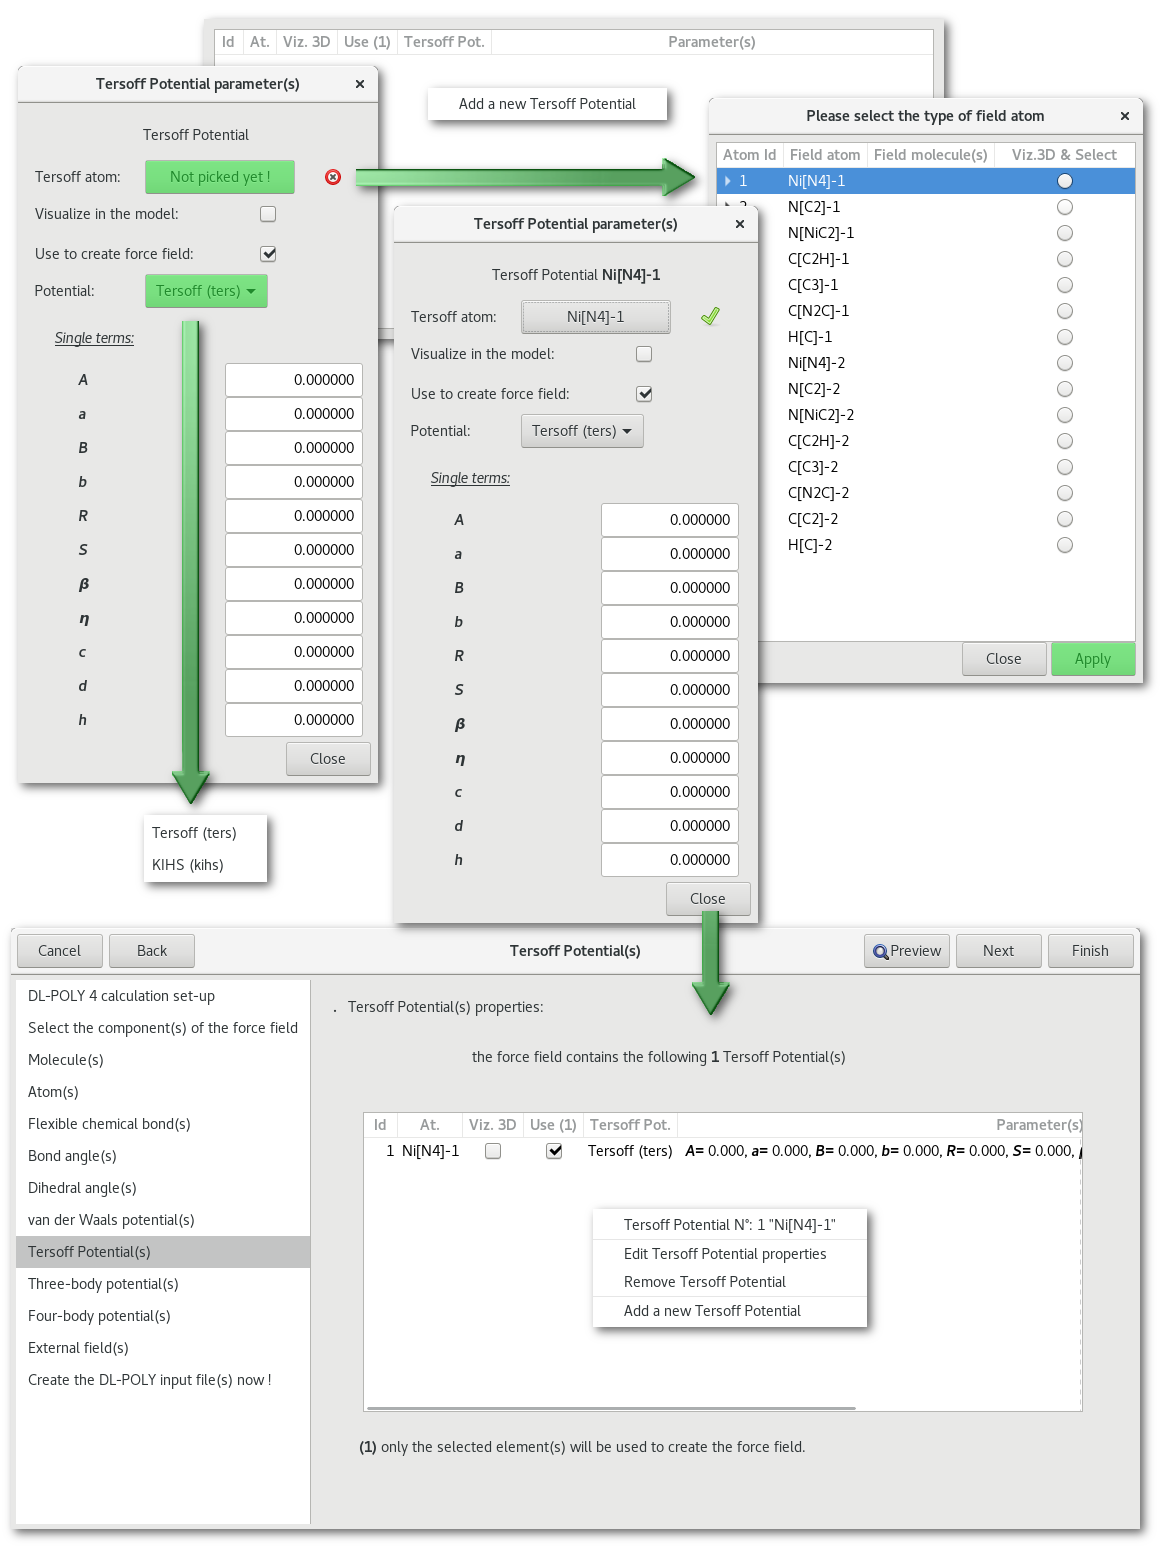
"Tersoff potential(s)"
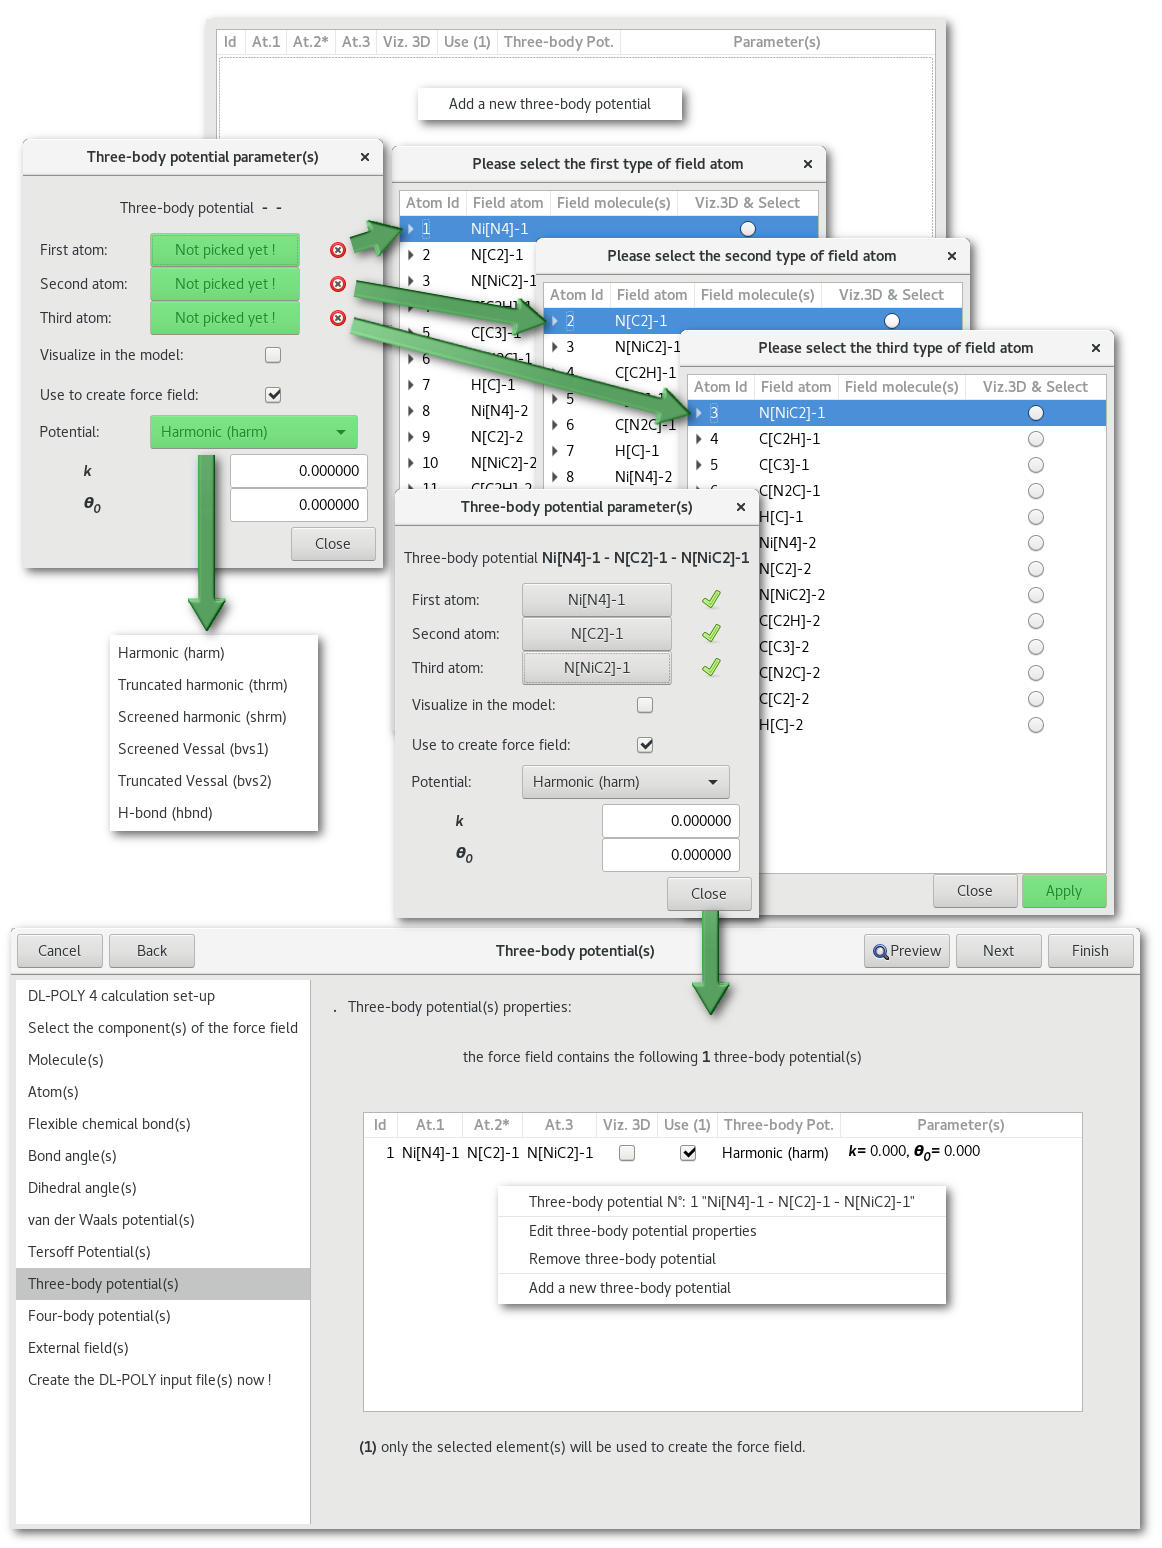
"Three body potential(s)"
"Four body potential(s)"

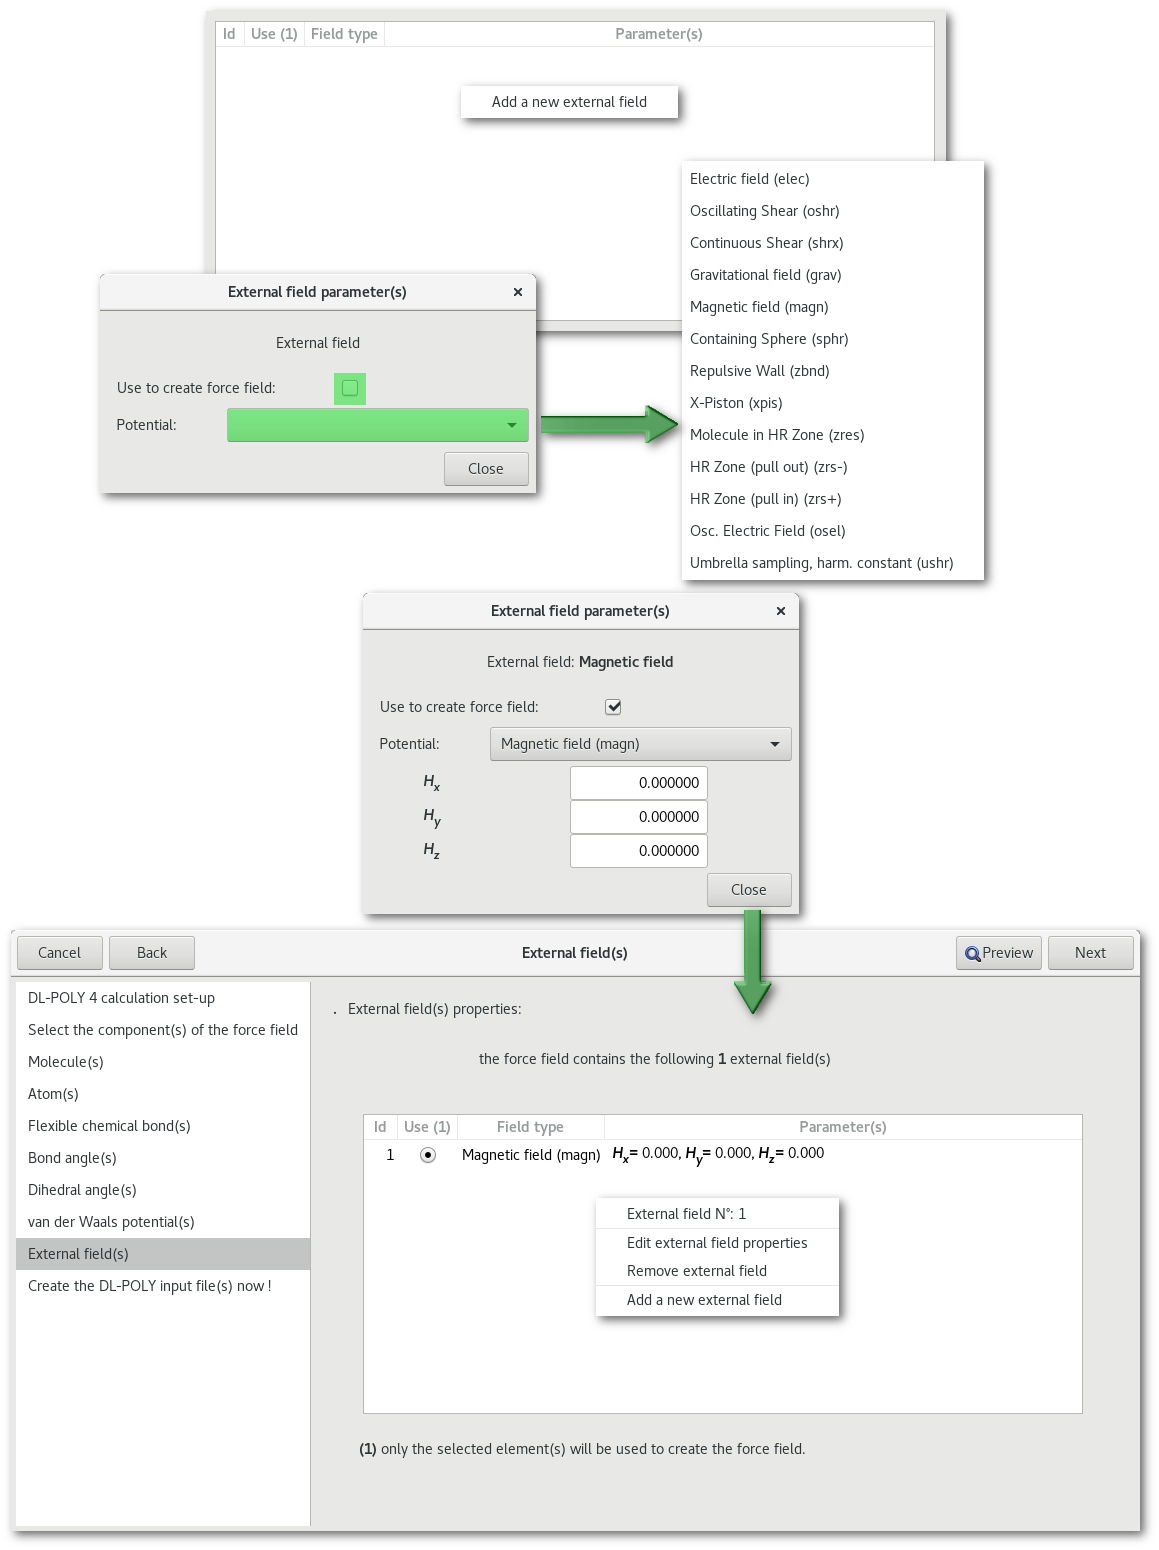
"External field(s)"
"Preview"
At any time when using the "DL-POLY" assistant, the "Preview" button allows open the "DL-POLY files preview" dialog, to visualize the "CONTROL", "FIELD" and "CONFIG" file(s).
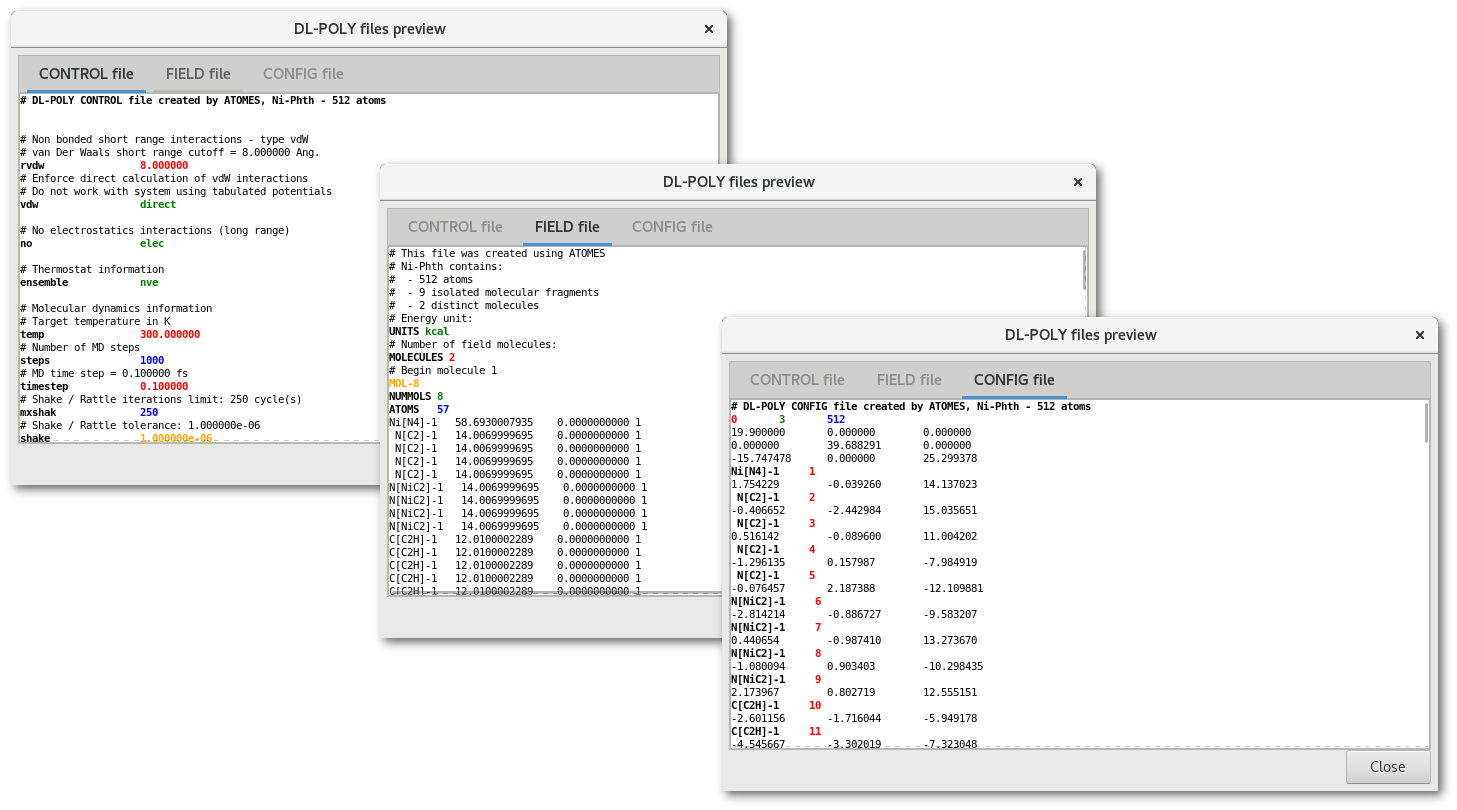
The "DL-POLY files preview" dialog (fig. 7.34) contains a notebook with up to 3 tabs depending on the file(s) to be created. Each tab presents the content of a file, "CONTROL", "FIELD" or "CONFIG", and highlights option(s) and keyword(s) using color(s) and font layout option(s).
Finalizing the assistant and file(s) creation
When pressing the "Apply" button on the file tab of the assistant, the user is asked to selected a folder. "CONTROL", "FIELD" and "CONFIG" if selected, will be created in the selected directory.
Following the file(s) creation or if the assistant is closed anyway, the "DL-POLY" force field data will be preserved. Therefore allowing the re-open the assistant later for further modifications.
All existing force field data can also saved in the Atomes project and/or workspace files, simply remember to save your work.